Difference between revisions of "Creating your first Cell"
| (6 intermediate revisions by the same user not shown) | |||
| Line 1: | Line 1: | ||
In this tutorial we're going to create a new [[Cell]], in particular, a new Interior Cell. It will represent the Interior of a shack situated in the Cell "Virrihael(0,-2)". | In this tutorial we're going to create a new [[Cell]], in particular, a new Interior Cell. It will represent the Interior of a shack situated in the Cell "Virrihael(0,-2)", that will be owned by the NPC "Uriel" we've created in the [[NPCs Creation]] tutorial. | ||
== Primer on Cells == | == Primer on Cells == | ||
| Line 35: | Line 35: | ||
Perfect, we're able to switch back and forth Cells & Worldspace. Notice that in the Interior Cell the structure is the same, there are few father GameObjects and everything is else is a child of them. | |||
Perfect, we're able to switch back and forth [[Cell|Cells]] & [[Worldspace|Worldspaces]]. Notice that in the Interior Cell the structure is the same, there are few father GameObjects and everything is else is a child of them. | |||
Play a little bit with it, maybe load the cell "Virrihael(0,0)" go in the City and try to enter a few Interiors. | Play a little bit with it, maybe load the cell "Virrihael(0,0)" go in the City and try to enter a few Interiors. | ||
| Line 46: | Line 47: | ||
⠀⠀ | ⠀⠀ | ||
⠀ | |||
⠀ | |||
⠀ | |||
⠀ | |||
== Creating a New Cell == | == Creating a New Cell == | ||
| Line 51: | Line 60: | ||
I'm gonna show here how to do it by duplication, since it will allow us to already have the house interior 3d models and collisions.The Cell we are going to duplicate is the Inteiror we just saw, the "Veras Farmhouse". | I'm gonna show here how to do it by duplication, since it will allow us to already have the house interior 3d models and collisions.The Cell we are going to duplicate is the Inteiror we just saw, the "Veras Farmhouse". | ||
[[File:Cryfc02 .png|thumb|The Project Window with the duplicated assets.]] | |||
Find the "[CELL] Virrihael02_VerasFarmhouse" file in your project and duplicate it with CTRL+D. Duplicate the scene as well and rename both files with meaningufl name, mine will be "UrielsShack". | |||
Now click on "[CELL] UrielsShack" and focus in the Inspector. | |||
'''Set the ID''', I'll have it to be "UrielsShack", then the '''Name''', I'll have it "Shack", then assign the Scene Ref to the scene you've duplicated. | |||
You'll have the message: [[File:Crfy 001.png]] click on "Add (buildindex)" and then select "Add as Enabled". The dot should display a green light. | |||
[[File:Jfbz01.png|thumb|301x301px|The Worldspace file with the new UrielsShack cell added to it.]] | |||
Perfect, now we need to select the '''[[Worldspace]]''' of this Cell, in this case it will be the ''Interiors Worldspace'' that is already selected, so no further action is required, but we need to let know to the Worldspace that this Cell has been added to it, so find in the Project the file "''[WORLDSPACE] Interiors Worldspace''" and under "Cells" add a new element and select the "[CELL] UrielsShack" we just created. | |||
If everything went alright, in the Cell View if you select as worldspace "Interiors" you should see the UrielsShack cell, and if you double click on it it should open the Scene we've duplicated. | |||
[[File:Cebnsfjjb 01.png|266x266px]] | |||
== Cleaning and setting up the new Scene == | |||
Open the UrielsShack we've just created and now we have to clean it up a bit, because it contains some stuff that shouldn't be present there. | |||
First of all, delete the "'''QUEST_RELATED'''" GameObject, as it contains elements for the quest that happens inside the original Cell we've duplicated this from. Then delete the GameObject "'''QI_HalfWrittenNoteInWorld'''", as it is a Quest Item that will make a quest progress. Last thing you want to delete are the AI present in this Cell, open the "AI_Container" GameObject and delete both "[AI] DeadGuard001_01" and "[AI] DeadGuard002_01". | |||
Now, select the "CellInformation" GameObject and in the Inspector assign the '''Cell''' to be "[CELL] UrielsShack". Still in the CellInformation, click on [[Update the Cells|Update Cell]] and then on '''Regenerate All Items GUID'''. The first one will update the cell, the second button will make the Items In World that are present in this scene '''unique''' and they will become not related anymore to the one existed in the original Cell we've duplicated this from. If you miss this step, taking an Item from one interior will make it disappear also in the other interior. | |||
Last thing we are going to do now, click on the Door and focus on the "Door" component. Then change the '''Object Reference ID''' to something like "UrielsShackToVirrihael" and make sure to save the scene. | |||
As an extra, to make sure the scene is different from the original, I'm going to delete the flipped table and chairs. | |||
Once you did that, '''Save again''', and the Cell is now setup. Now we just need to link it with a Door. | |||
== Creating a Door and Linking the Cells == | |||
Let's go back to the Cell "Virrihael(0,-2)" and let's go near the Shack, we are going to add a [[Door]]. | |||
[[File:Cyfc d1.png|thumb|The [[Door]] added to the Shack.]] | |||
Search for the "EmptyDoor" prefab in the Project Window and drag it into the scene, move, rotate and scale it until it matches the Shack's door, the click on the "Door Teleport Marker" and place it just outside the door, where the Player will spawn when he will use the opposite door. | |||
Set the EmptyDoor as a child of the "small_shack" GameObject, this is not required but it keeps things tidy. | |||
Now focus on the "Door" component and change the '''Obj Reference ID''' to something meaningful, I'll have "VirrihaelToUrielsShack", this will be the ID of the door. | |||
Then focus on the "Door Teleport" section and change "'''To Cell'''" to be the "[CELL] UrielsShack". This will set the Cell that this door will bring us to. | |||
Next, at the bottom of the Component click on the "Refresh" button and on the '''Linked Door''', a menu will appear and you should see the '''ID''' you gave to the door during the Cleaning and setting up, in my case "UrielsShackToVirrihael". | |||
[[File:Rckcryf 1.png|305x305px]] | |||
Click on it and Save the scene. | |||
Now we're able to enter inside the Shack from this door, but if we'll exit now we'll return to the wrong cell. Let's fix that. | |||
Click on "View Linked Door" and you should go inside the Interior. With the Door focused, change the '''To Cell''' reference to "Virrihael(0,-2)" (the exterior we've edited that contains the Shack" and change the '''Linked Door''' to be the one we've created, in my case "VirrihaelToUrielsShack". | |||
And that's it, '''save''' the scene and click again on "View Linked Door", if everything is setup correctly you should be able to jump back and forth the cells. | |||
== Testing == | |||
Load a savegame and reach the shack, if everything has been done correctly, the Doors will let you go in and out the Shack. | |||
[[File:Rckcyfc 01t.png|left|thumb|The Door outisde the Shack.]] | |||
[[File:Rckcyfc 02t.png|none|thumb|The Shack's Interior.]] | |||
[[File:Rckcyfc 03t.png|none|thumb|The Interior's Door that will bring the Player outside the Shack.]] | |||
Latest revision as of 11:54, 19 February 2022
In this tutorial we're going to create a new Cell, in particular, a new Interior Cell. It will represent the Interior of a shack situated in the Cell "Virrihael(0,-2)", that will be owned by the NPC "Uriel" we've created in the NPCs Creation tutorial.
Primer on Cells
In this section we're going to quickly analyze how a Cell is composed.
Focus on the "Cell View" window and select as Worldpsace "Virrhael", then load the Cell with ID "Virrihael(0,2)".
The first thing that you should notice straight away, it's that it is the Cell present in the demo, and more in particular it's the house we go and search with Ryan in the Demo, during the quest "The Southern Harvest", playable by joining The King's faction. You can notice it is an Exterior Cell, because it's a Cell that is a tile of a bigger world.
Let's take a look in the Hierarchy. Every cell is composed of at least those GameObject:
- CellInfo: Contains the script responsaible for storing the Information of a Cell, such as the Cell file, the Cell Entry, all the doors, paths, Action Points etc. present in the Cell.
- Entry: Represents the Entry Point of the cell, it is usually always in the middle of it.
- Structures: Is just a GameObject that contains every structure of the Cell, such as houses, Items in World, props and so on and so forth.
- Paths: Contains all the NPC Paths present in this Cell.
- AI_Container: Contains all the AI placed in this cell.
- CreatedItemsT: Is just a GameObject that will contain every item the Player will create inside this cell by dropping them into the Inventory or dragging them to this cell from others.
- Navmesh: Is the GameObject who has the Component responsabile to generating the Navmesh of the cell.
Now I want to say something that you should take as a rule, you should always have few GameObject in the root of your scene. Just as it happens here, the scene is composed of 11 "father" GameObject, and every other GameObject is a child of one of those 11. You should always keep your "father" GameObjects count low and put everything else inside them, for both having the Scenes tidy and ordered but most importantly because some Editor code will reference to that, and the loading times for some action will take longer if the Scene is disorganized.
Doors and Cells
Great, now if you take a closer look at the Cell, you will notice that on the House's door, there is a white box with an arrow. You're in the presence of a Door, a connection between Cells and Worldspaces. Every Door has a white box that represents where the Player or NPC will spawn when the opposite door is used. That is the "Door Teleport Marker". Make sure to read the Door article before going forward.
Now click on the door and take a look at the "Door" component.
We're interested in the "Door Teleport" section, you can see that this door is used to Teleport who uses it to another Cell, and this cell is "[CELL] Virrihael02_VerasFarmhouse".
Now look at the bottom the "Door Link" section, here you'll see (and set) what is the opposite door, what is its ID and if you click on "View Linked Door", the Editor will open the connected Cell and bring you immediatly there.
Perfect, we're able to switch back and forth Cells & Worldspaces. Notice that in the Interior Cell the structure is the same, there are few father GameObjects and everything is else is a child of them.
Play a little bit with it, maybe load the cell "Virrihael(0,0)" go in the City and try to enter a few Interiors.
⠀⠀
⠀⠀
⠀⠀
⠀⠀
⠀
⠀
⠀
⠀
Creating a New Cell
In this section we will actually create a new cell, there are two ways you can do that, creating a new cell from scratch or duplicating an existing one.
I'm gonna show here how to do it by duplication, since it will allow us to already have the house interior 3d models and collisions.The Cell we are going to duplicate is the Inteiror we just saw, the "Veras Farmhouse".
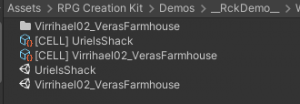
Find the "[CELL] Virrihael02_VerasFarmhouse" file in your project and duplicate it with CTRL+D. Duplicate the scene as well and rename both files with meaningufl name, mine will be "UrielsShack".
Now click on "[CELL] UrielsShack" and focus in the Inspector.
Set the ID, I'll have it to be "UrielsShack", then the Name, I'll have it "Shack", then assign the Scene Ref to the scene you've duplicated.
You'll have the message:  click on "Add (buildindex)" and then select "Add as Enabled". The dot should display a green light.
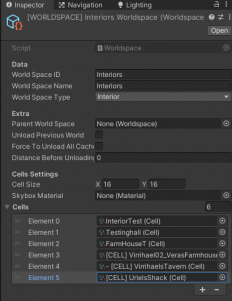
Perfect, now we need to select the Worldspace of this Cell, in this case it will be the Interiors Worldspace that is already selected, so no further action is required, but we need to let know to the Worldspace that this Cell has been added to it, so find in the Project the file "[WORLDSPACE] Interiors Worldspace" and under "Cells" add a new element and select the "[CELL] UrielsShack" we just created.
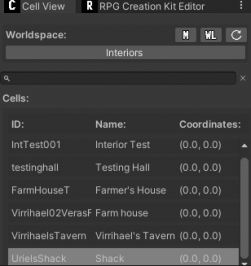
If everything went alright, in the Cell View if you select as worldspace "Interiors" you should see the UrielsShack cell, and if you double click on it it should open the Scene we've duplicated.
Cleaning and setting up the new Scene
Open the UrielsShack we've just created and now we have to clean it up a bit, because it contains some stuff that shouldn't be present there.
First of all, delete the "QUEST_RELATED" GameObject, as it contains elements for the quest that happens inside the original Cell we've duplicated this from. Then delete the GameObject "QI_HalfWrittenNoteInWorld", as it is a Quest Item that will make a quest progress. Last thing you want to delete are the AI present in this Cell, open the "AI_Container" GameObject and delete both "[AI] DeadGuard001_01" and "[AI] DeadGuard002_01".
Now, select the "CellInformation" GameObject and in the Inspector assign the Cell to be "[CELL] UrielsShack". Still in the CellInformation, click on Update Cell and then on Regenerate All Items GUID. The first one will update the cell, the second button will make the Items In World that are present in this scene unique and they will become not related anymore to the one existed in the original Cell we've duplicated this from. If you miss this step, taking an Item from one interior will make it disappear also in the other interior.
Last thing we are going to do now, click on the Door and focus on the "Door" component. Then change the Object Reference ID to something like "UrielsShackToVirrihael" and make sure to save the scene.
As an extra, to make sure the scene is different from the original, I'm going to delete the flipped table and chairs.
Once you did that, Save again, and the Cell is now setup. Now we just need to link it with a Door.
Creating a Door and Linking the Cells
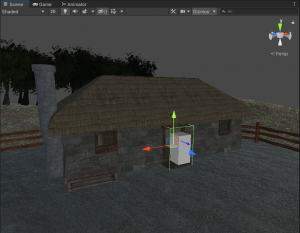
Let's go back to the Cell "Virrihael(0,-2)" and let's go near the Shack, we are going to add a Door.
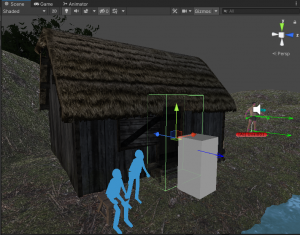
Search for the "EmptyDoor" prefab in the Project Window and drag it into the scene, move, rotate and scale it until it matches the Shack's door, the click on the "Door Teleport Marker" and place it just outside the door, where the Player will spawn when he will use the opposite door.
Set the EmptyDoor as a child of the "small_shack" GameObject, this is not required but it keeps things tidy.
Now focus on the "Door" component and change the Obj Reference ID to something meaningful, I'll have "VirrihaelToUrielsShack", this will be the ID of the door.
Then focus on the "Door Teleport" section and change "To Cell" to be the "[CELL] UrielsShack". This will set the Cell that this door will bring us to.
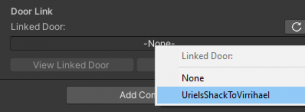
Next, at the bottom of the Component click on the "Refresh" button and on the Linked Door, a menu will appear and you should see the ID you gave to the door during the Cleaning and setting up, in my case "UrielsShackToVirrihael".
Click on it and Save the scene.
Now we're able to enter inside the Shack from this door, but if we'll exit now we'll return to the wrong cell. Let's fix that.
Click on "View Linked Door" and you should go inside the Interior. With the Door focused, change the To Cell reference to "Virrihael(0,-2)" (the exterior we've edited that contains the Shack" and change the Linked Door to be the one we've created, in my case "VirrihaelToUrielsShack".
And that's it, save the scene and click again on "View Linked Door", if everything is setup correctly you should be able to jump back and forth the cells.
Testing
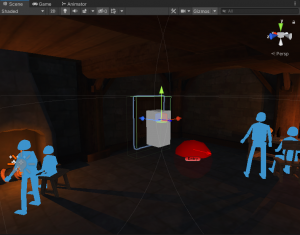
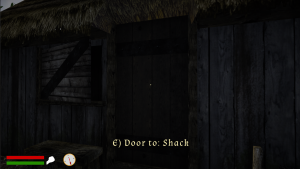
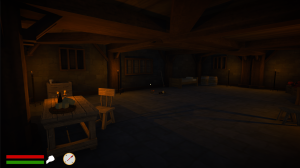
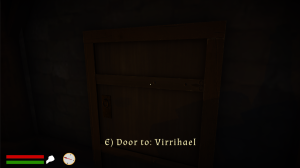
Load a savegame and reach the shack, if everything has been done correctly, the Doors will let you go in and out the Shack.
