Difference between revisions of "Installing the RPG Creation Kit"
| (17 intermediate revisions by the same user not shown) | |||
| Line 2: | Line 2: | ||
It is '''highly''' recommend to create a new Unity Project to have a fresh and clean installation and to keep the project clean during the "Getting Started" tutorial series. The project was made with Unity 2020.3.25f1, and it should support any newer version. | It is '''highly''' recommend to create a new Unity Project to have a fresh and clean installation and to keep the project clean during the "Getting Started" tutorial series. The import of the package will override your Project Settings, hence you should create a new one. | ||
== Editor Versions == | |||
The project was made and released with Unity 2020.3.25f1, and it should support any newer version. | |||
The official supported releases are: | |||
* '''2020.3.25f1''' | |||
* '''2021.3.43f1''' | |||
* '''2022.3.4f1''' | |||
* '''Unity 6 6000.0.32f1''' | |||
This means when submitting an Update I will personally test the RCK on these Editor versions. However, anything '''higher''' than these versions should work correctly, as it's the case with many users using different versions from the ones listed above. | |||
== Installation == | == Installation == | ||
If you're going to install the RCK on a Unity version prior to Unity 6, follow this guide. Otherwise if you're using Unity 6 look at the next section "Installation on Unity 6" | |||
Before installing the RPG Creation Kit, make sure your project contains and uses the '''new Unity's Input System'''. | |||
If it doesn't, while importing the package it will propt you to switch to the new Unity's Input System, you'll have to click YES, the Editor will restart and you'll have to import the RPG Creation Kit again. | |||
When importing the package you will be prompted with this window: | |||
[[File:Installing_1.png]] | |||
You need to click "'''Import'''" and override the Project Settings. | You need to click "'''Import'''" and override the Project Settings. | ||
| Line 15: | Line 35: | ||
Next, you need to select what to import in the project, obviously you need everything, so click the "All" button and then "Import". | Next, you need to select what to import in the project, obviously you need everything, so click the "All" button and then "Import". | ||
[[File: | [[File:Installing_2.png|420x420px]] | ||
Once everything is imported, check the console to see if there are any errors, if there are none, click the Play button and if the game starts everything should be ok. | |||
If you are getting errors make sure the dependencies are installed properly. | |||
The RPG Creation Kit uses the new Unity Input's System, obtainable from the Package Manager, if you're getting errors regarding "Input" or "Input System", make sure you have installed and enabled the newer Input System. For an installation guide of the Input System, [https://docs.unity3d.com/Packages/com.unity.inputsystem@1.3/manual/Installation.html click here]. If you have installed the Input System after importing the RPG Creation Kit, or if you are not able to click on UI, restart Unity. | |||
== Installation on Unity 6 6000.0.32f1 == | |||
If you're using Unity 6, the first step is to open the Package Manager and click the button '''"+ Import version to Project":''' | |||
[[File:U6 1.png|608x608px]] | |||
You'll be prompted with the following dialog: | |||
[[File:U6 2.png|504x504px]] | |||
'''Click on 'Import'.''' | |||
After some loading, you will be prompted again with this warning: | |||
[[File:U6 3.png|462x462px]] | |||
'''Click on 'Install/Upgrade'.''' | |||
Later, you'll get asked which assets you want to import in your project: | |||
[[File:U6 4.png|516x516px]] | |||
'''Make sure EVERYTHING is selected!''' The 'All' button on the top-left should be gray indicating everything is already selected. Then, '''click on 'Next'.''' | |||
The dialogue will move to the next page: | |||
[[File:U6 5.png|562x562px]] | |||
'''Again, make sure EVERYTHING is selected.''' The 'All' button on the top-left should be gray indicating everything is already selected. '''Then, click on 'Import'.''' | |||
The import process will start, at some point, you will be prompted with the following dialogue: | |||
[[File:U6 6.png|614x614px]] | |||
'''Click on 'Yes, for these and other files that might be found later''''. | |||
The import process will continue for some time. When it will end, the '''TextMeshPro dialog should pop-up:''' | |||
[[File:U6 7.png|608x608px]] | |||
'''Click first on 'Import TMP Essentials'<nowiki/>'''. After you did that, the ''''Import TMP Examples & Extra' will become clickable, so click it as well:''' | |||
[[File:U6 8.png|649x649px]] | |||
'''Once you've done that, the RPG Creation Kit will be correctly installed!''' | |||
[[File:Working rck6.png|715x715px]] | |||
'''You can use the RCK Layout windows as explained in the next chapter:''' | |||
== Layout and Verification == | |||
Before going forward, I highly suggest you to use, at least at this stage of learning, the "RPG Creation Kit Windows Layout", as the layout of the windows is a fundamental part of the workflow. | |||
On the top-right of the screen click on "Layout -> Load Layout From file" and import the file "RPGCreationKit.wlt" located at: | |||
''Note: On newer versions of Unity (2021+) you may have to do "Window> Layout ->Load Layout From file" instead.'' | |||
"Assets/RPG Creation Kit/Templates/RPGCreationKit.wtl". | |||
The Editor will reload and you should have this situation: | |||
[[File:Installing 3.png|center|884x884px| | |||
]] | |||
We'll get through every window later, for now focus on the '''Cell View.''' | |||
On the top-right of the window you'll see three buttons "'''M'''" "'''WL'''" and "'''Refresh'''", click on "M" to load the main menu and hit "Play" to play the game. | |||
If everything is installed correctly you should be able to play through the demo just as you did with the executable, so try a little bit, create a new character, load savegames and play with it to ensure everything works as it should. | |||
Latest revision as of 11:14, 3 January 2025
This article is dedicated to the installation of the RPG Creation Kit and the checks to perform in order to know if everything installed correctly.
It is highly recommend to create a new Unity Project to have a fresh and clean installation and to keep the project clean during the "Getting Started" tutorial series. The import of the package will override your Project Settings, hence you should create a new one.
Editor Versions
The project was made and released with Unity 2020.3.25f1, and it should support any newer version.
The official supported releases are:
- 2020.3.25f1
- 2021.3.43f1
- 2022.3.4f1
- Unity 6 6000.0.32f1
This means when submitting an Update I will personally test the RCK on these Editor versions. However, anything higher than these versions should work correctly, as it's the case with many users using different versions from the ones listed above.
Installation
If you're going to install the RCK on a Unity version prior to Unity 6, follow this guide. Otherwise if you're using Unity 6 look at the next section "Installation on Unity 6"
Before installing the RPG Creation Kit, make sure your project contains and uses the new Unity's Input System.
If it doesn't, while importing the package it will propt you to switch to the new Unity's Input System, you'll have to click YES, the Editor will restart and you'll have to import the RPG Creation Kit again.
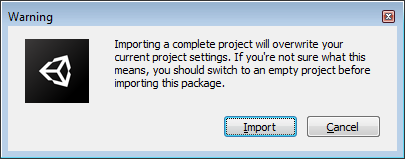
When importing the package you will be prompted with this window:
You need to click "Import" and override the Project Settings.
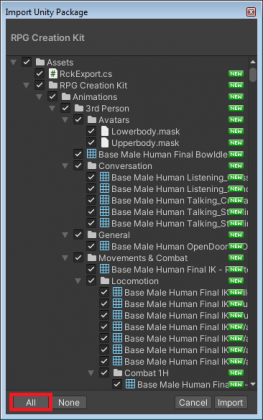
Next, you need to select what to import in the project, obviously you need everything, so click the "All" button and then "Import".
Once everything is imported, check the console to see if there are any errors, if there are none, click the Play button and if the game starts everything should be ok.
If you are getting errors make sure the dependencies are installed properly.
The RPG Creation Kit uses the new Unity Input's System, obtainable from the Package Manager, if you're getting errors regarding "Input" or "Input System", make sure you have installed and enabled the newer Input System. For an installation guide of the Input System, click here. If you have installed the Input System after importing the RPG Creation Kit, or if you are not able to click on UI, restart Unity.
Installation on Unity 6 6000.0.32f1
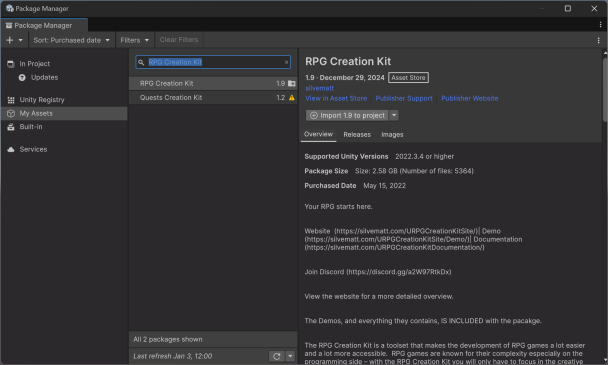
If you're using Unity 6, the first step is to open the Package Manager and click the button "+ Import version to Project":
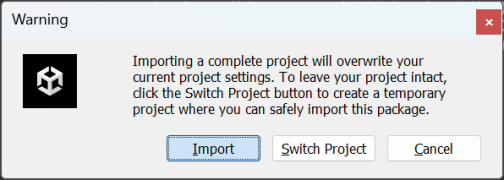
You'll be prompted with the following dialog:
Click on 'Import'.
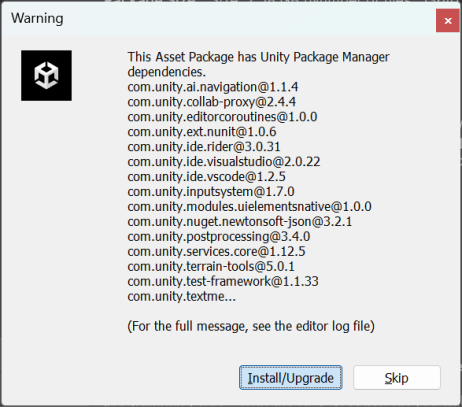
After some loading, you will be prompted again with this warning:
Click on 'Install/Upgrade'.
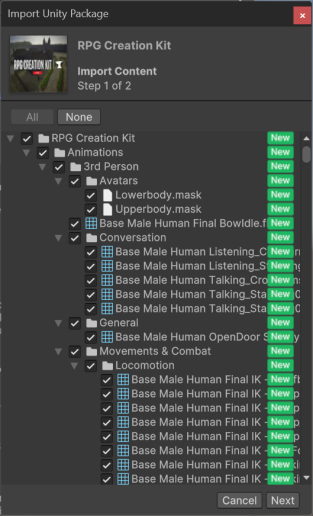
Later, you'll get asked which assets you want to import in your project:
Make sure EVERYTHING is selected! The 'All' button on the top-left should be gray indicating everything is already selected. Then, click on 'Next'.
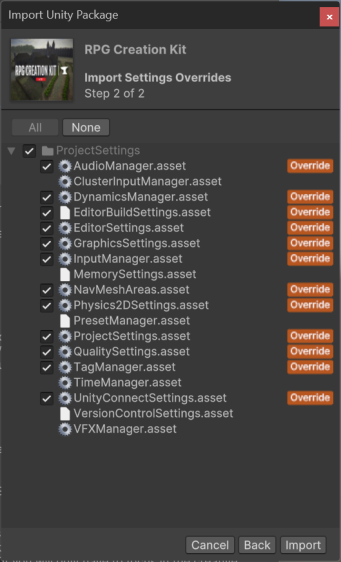
The dialogue will move to the next page:
Again, make sure EVERYTHING is selected. The 'All' button on the top-left should be gray indicating everything is already selected. Then, click on 'Import'.
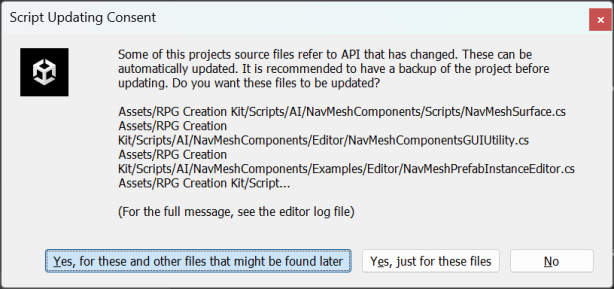
The import process will start, at some point, you will be prompted with the following dialogue:
Click on 'Yes, for these and other files that might be found later'.
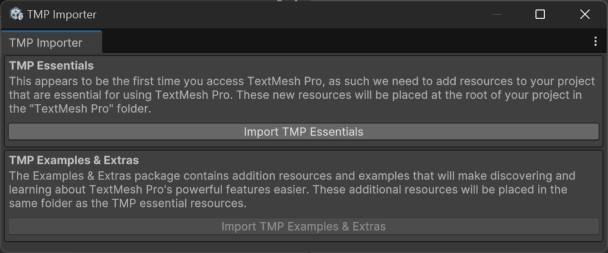
The import process will continue for some time. When it will end, the TextMeshPro dialog should pop-up:
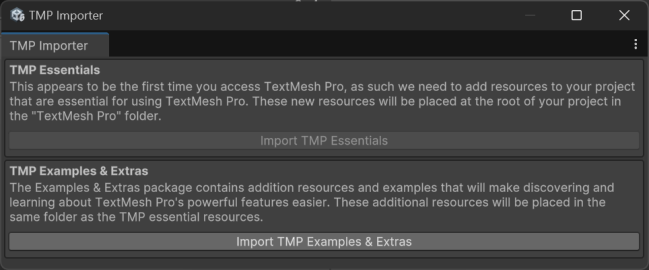
Click first on 'Import TMP Essentials'. After you did that, the 'Import TMP Examples & Extra' will become clickable, so click it as well:
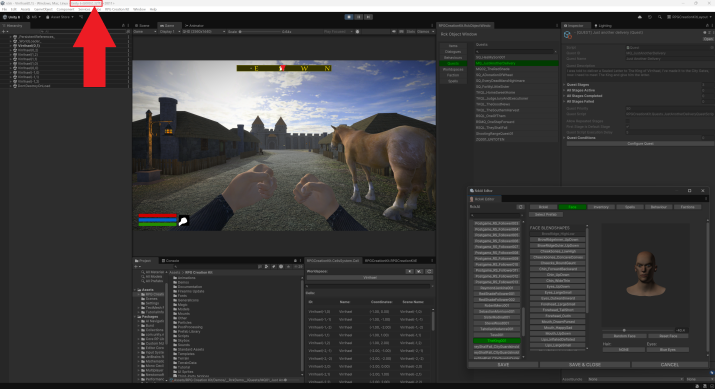
Once you've done that, the RPG Creation Kit will be correctly installed!
You can use the RCK Layout windows as explained in the next chapter:
Layout and Verification
Before going forward, I highly suggest you to use, at least at this stage of learning, the "RPG Creation Kit Windows Layout", as the layout of the windows is a fundamental part of the workflow.
On the top-right of the screen click on "Layout -> Load Layout From file" and import the file "RPGCreationKit.wlt" located at:
Note: On newer versions of Unity (2021+) you may have to do "Window> Layout ->Load Layout From file" instead.
"Assets/RPG Creation Kit/Templates/RPGCreationKit.wtl".
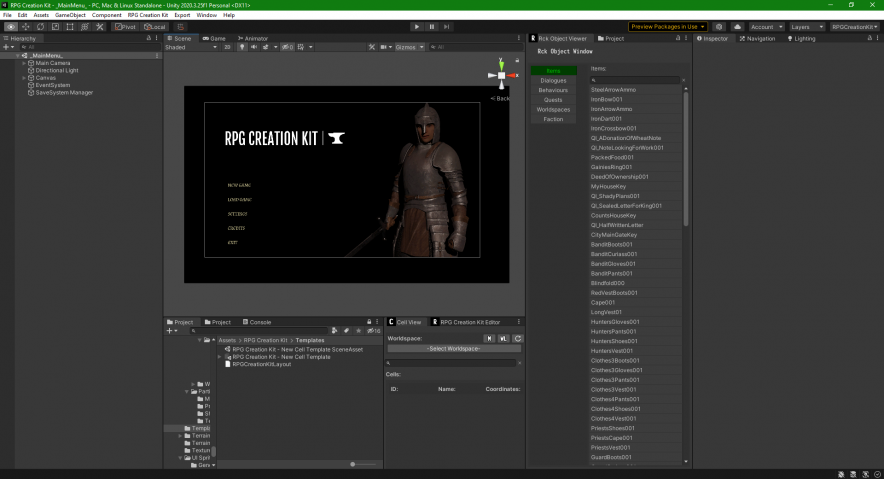
The Editor will reload and you should have this situation:
We'll get through every window later, for now focus on the Cell View.
On the top-right of the window you'll see three buttons "M" "WL" and "Refresh", click on "M" to load the main menu and hit "Play" to play the game.
If everything is installed correctly you should be able to play through the demo just as you did with the executable, so try a little bit, create a new character, load savegames and play with it to ensure everything works as it should.
