Difference between revisions of "Interactive Objects"
(Created blank page) |
|||
| Line 1: | Line 1: | ||
Interactive Objects are a way of interacting with elements placed in the world that allow to trigger events. | |||
In this article, we're going to create an Interactive Object that, upon interaction, will unlock a door. | |||
== Creating the Interactive Object file == | |||
The first step is to create the Interactive Object file in the project. Right click in the Project Window: | |||
'''Create->RPG Creation Kit->Interactive Objects->New Interactive Object.''' | |||
Rename it something meaningful, in this case, the Interactive Object will be a lever that will unlock the door of a house located inside the city, its Ref ID is "CityInteriorToHartwinGilHouse" and it is placed in the cell "''CityInteriorCell''". It is the first and nearest house on the left when you enter the city. | |||
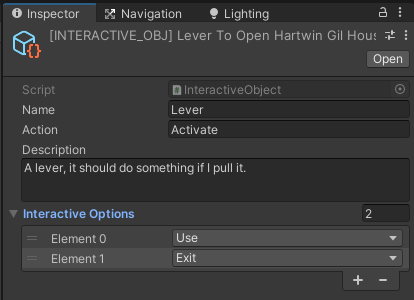
I'll name the object "'''[INTERACTIVE_OBJ] LeverToOpenHartwinGilHouse'''", and I'll set the inspector as follows: | |||
[[File:IO 0.png]] | |||
Let's analyze the content: | |||
* '''Name''': the name of the object, it will be displayed on screen when the player will be close enough to interact with this object. | |||
* '''Action:''' the action that will be displayed on screen when the player will be close enough to interact with this object, in this case, "'''E) Activate: Lever'''" will be displayed. | |||
* '''Description:''' A description of the Interactive Object that will be displayed on the UI. | |||
* '''Interactive Options:''' A list of actions the player can do, each of which can trigger different events. | |||
You can set an undefined number of Interactive Options and even add new, but you should not have duplicates such as "Use" added two or more times. | |||
== Creating the Interactive Object In World == | |||
Let's load the ''CityInteriorCell'' and reach ''Hartwin Gil'' house, if you're wondering who he is, he's just an unused NPC who sits in his house that is forever locked. | |||
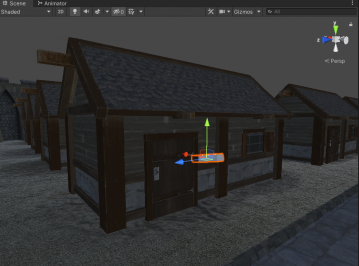
I'm just going to add a cube GameObject and shape it in the form of a lever and attach it to his house. | |||
[[File:IO 1.png|359x359px]] | |||
Next, click on the lever and we have to add the "'''Interactive Object_Behaviour'''" component. The inspector will ask for an "Interactive Object", we've just created it and we're going to reference that. | |||
The Inspector will change, you will se the Interactive Options we've previously added to the file ("Use", "Exit") followed with the classic '''Event''' list. | |||
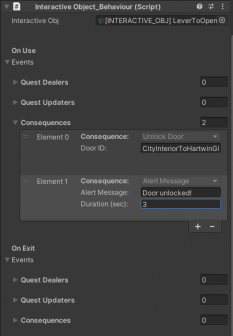
Upon each interaction, the events corresponding to the "OnAction" will be triggered, we want to add a Consequence to the '''OnUse''' event that unlocks the door: | |||
[[File:IO 2.png|336x336px]] | |||
And that's it. | |||
== Testing == | |||
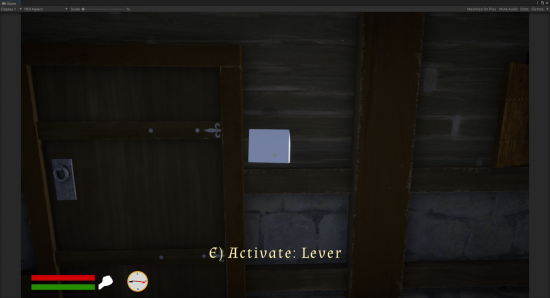
Reach the City and the Lever will be there: | |||
[[File:IO 3.png|550x550px]] | |||
Notice the '''Activate''' and '''Lever''', which are the strings we've inserted in the Interactive Object file. | |||
When pressing E), the Interactive UI interface will open: | |||
[[File:IO 4.png|555x555px]] | |||
And you will have a list of buttons that mirror the Interactive Options we've set in the Interactive Object file. Upon clicking on a button, the Interactive UI will close and the corresponding Events will be triggered, in this case, when pressing "'''Use'''" the Door will unlock and there will be an Alert Message displayed on the screen. | |||
== Adding a new Interactive Option == | |||
You may want to add your own actions for your own objects, doing that is very easy. | |||
All you have to do is to open the script "'''InteractiveObject.cs'''" and reach around line 13, look for the line: | |||
[[File:IO 5.png]] | |||
Then you just have to add a comma "''','''" after Take and type your new action, I will add the action "'''Destroy'''": | |||
[[File:IO 8.png]] | |||
'''And that's it!''' | |||
Go back to Unity and next time you will configure an Interactive Object, you will have the chance to add a "'''Destroy'''" action. | |||
[[File:IO 6.png]] | |||
[[File:IO 7.png]] | |||
[[File:IO 9.png|579x579px]] | |||
''Note: your previously inserted events may be lost when you add or edit Interactive Options from the Interactive Object file, so make sure to write them down and restore them.'' | |||
Latest revision as of 12:24, 7 December 2022
Interactive Objects are a way of interacting with elements placed in the world that allow to trigger events.
In this article, we're going to create an Interactive Object that, upon interaction, will unlock a door.
Creating the Interactive Object file
The first step is to create the Interactive Object file in the project. Right click in the Project Window:
Create->RPG Creation Kit->Interactive Objects->New Interactive Object.
Rename it something meaningful, in this case, the Interactive Object will be a lever that will unlock the door of a house located inside the city, its Ref ID is "CityInteriorToHartwinGilHouse" and it is placed in the cell "CityInteriorCell". It is the first and nearest house on the left when you enter the city.
I'll name the object "[INTERACTIVE_OBJ] LeverToOpenHartwinGilHouse", and I'll set the inspector as follows:
Let's analyze the content:
- Name: the name of the object, it will be displayed on screen when the player will be close enough to interact with this object.
- Action: the action that will be displayed on screen when the player will be close enough to interact with this object, in this case, "E) Activate: Lever" will be displayed.
- Description: A description of the Interactive Object that will be displayed on the UI.
- Interactive Options: A list of actions the player can do, each of which can trigger different events.
You can set an undefined number of Interactive Options and even add new, but you should not have duplicates such as "Use" added two or more times.
Creating the Interactive Object In World
Let's load the CityInteriorCell and reach Hartwin Gil house, if you're wondering who he is, he's just an unused NPC who sits in his house that is forever locked.
I'm just going to add a cube GameObject and shape it in the form of a lever and attach it to his house.
Next, click on the lever and we have to add the "Interactive Object_Behaviour" component. The inspector will ask for an "Interactive Object", we've just created it and we're going to reference that.
The Inspector will change, you will se the Interactive Options we've previously added to the file ("Use", "Exit") followed with the classic Event list.
Upon each interaction, the events corresponding to the "OnAction" will be triggered, we want to add a Consequence to the OnUse event that unlocks the door:
And that's it.
Testing
Reach the City and the Lever will be there:
Notice the Activate and Lever, which are the strings we've inserted in the Interactive Object file.
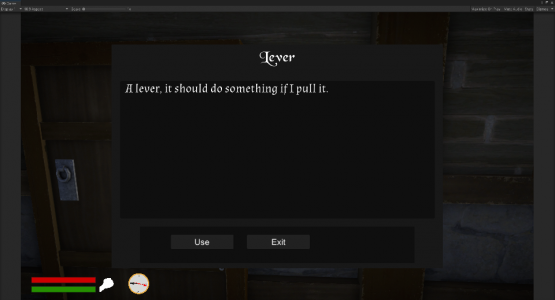
When pressing E), the Interactive UI interface will open:
And you will have a list of buttons that mirror the Interactive Options we've set in the Interactive Object file. Upon clicking on a button, the Interactive UI will close and the corresponding Events will be triggered, in this case, when pressing "Use" the Door will unlock and there will be an Alert Message displayed on the screen.
Adding a new Interactive Option
You may want to add your own actions for your own objects, doing that is very easy.
All you have to do is to open the script "InteractiveObject.cs" and reach around line 13, look for the line:
Then you just have to add a comma "," after Take and type your new action, I will add the action "Destroy":
And that's it!
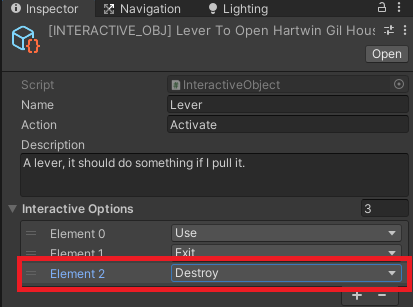
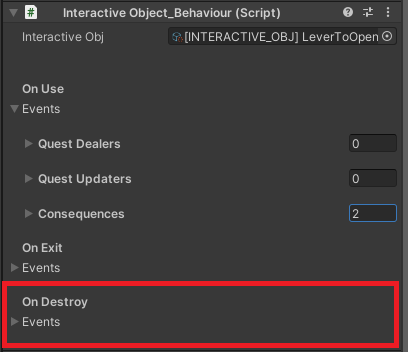
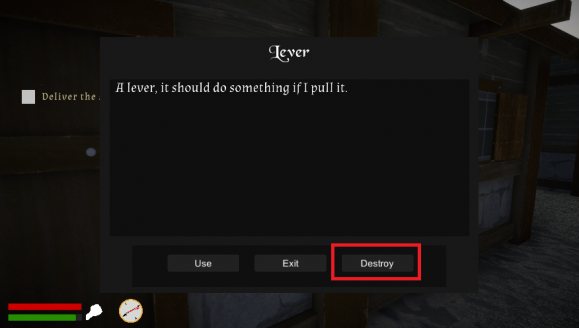
Go back to Unity and next time you will configure an Interactive Object, you will have the chance to add a "Destroy" action.
Note: your previously inserted events may be lost when you add or edit Interactive Options from the Interactive Object file, so make sure to write them down and restore them.
