Creating a New Creature AI
The Update 1.1 of the RPG Creation Kit introduced the Creature AI, which is a new type of AI Entity for the RPG Creation Kit built on top of the RckAI.
The Creature AI allows you to quickly setup any animated 3D model to be a AI Entity in the RPG Creation Kit, as opposed as the RckAI which requires you to setup a new Race and have your 3D models in a determined way.
In this tutorial, we are going to create the Skeleton featured in the Update video, a Skeleton made by IronicGame you can download for free on the Asset Store.
This model, other than being super cool, comes also with even cooler animations - I suggest you download that asset and follow along with it during this tutorial, then you'll be able to setup any other 3D Model you want.
Setting up the Animator
The first step we're are going to take is to setup the Animator.
Before we start, you can download it from this link to see how the transitions and the states are made.
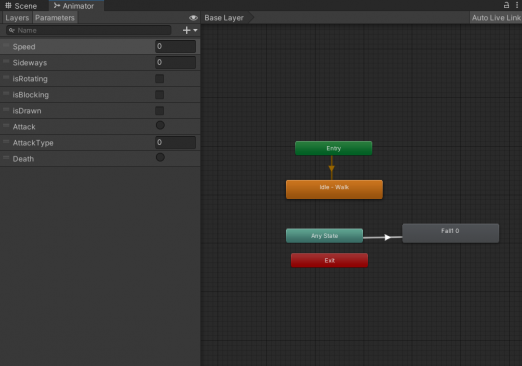
Open the SkeletonAC animator and let's focus on the "Parameters", every Animator you are going to make will need to use the same Parameters names and types as shown in this picture:
You'll also notice in the image above that I've only two States for the Default Animator Layer, "Idle-Walk" which is a BlendTree for the movement animation, and the "Fall 0" which is for the Death animation (if we're not going to use the ragdoll).
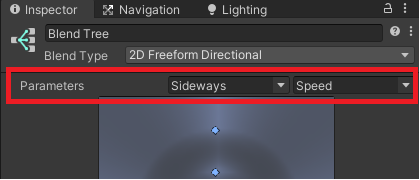
Before moving on, open the "Idle-Walk" BlendTree and make sure to set parameters to the just created "Sideways" and "Speed":
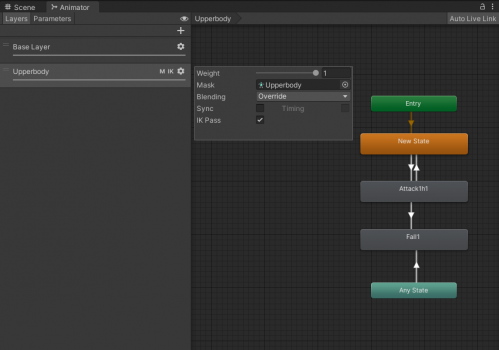
Now let's move to the "Layers" tab of the Animator, we have to add a new Layer (by right-clicking), let's call it "Upperbody". Click on the gear icon and set the Weight to 1, the Mask to Upperbody, the Blending to Override and you may want IK Pass as well.
The Upperbody is composed of:
- New State: an empty state (must be the default).
- Attack: the attack animation.
- Fall: the same death animation of the Base Layer, used to make sure it gets played on the Upperbody too when the Creature dies.
Of course those transitions are parameterized, and they use the parameters we've created above. Make sure to look at the file above to see how the transitions are made.
A word on the Attack animations, in this case there is only one, so it was not meaningful to use the "AttackType" parameter, but keep in mind that your Creature can chain attacks and you can control those with that parameter.
Setting up the Animations
The only job to get done to setup the animations is to set the Animation Events for the attacking animations, just like the Attacks of the RckAI.
Select in the Project Window the Attack1 animation and in the Inspector reach for "Events", you can add an Animation event by Right Clicking in the Timeline and clicking on "Add New Animation Event". For the Attack to work, you need at least three:
"AttackAnimationEvent": that should be where the attack is being executed (for example the blade has just started swinging).
"EndAttackAnimationEvent": that should be where the attack has ended (the swing ended).
"ResetAttackStateEvent": that should be at the end of the animation, it will tell that another attack can be performed.
Setting up the 3D Model
Creating the Creature AI
Result & Extra
If your Creatures are triggering you warnings in the Console like "Animator Parameter "isDrawn" parameter not found", you can suppress those by adding the said parameters to the Animator, even if they're unused.


