Your First Quest
In this tutorial we will use the NPC we've created in the NPCs Creation and the Cell we've created in the Creating your First Cell tutorial to create a fairly simple quest step by step.
Designing the quest
The first thing that we are going to do before actually doing anything is to design the quest. It is a good idea to think about the quest you want to make, the stages and how it should proceed before you actually start implement anything.
In this tutorial our quest is titled "To Break The Quiet", and it will go this way:
We'll encounter Uriel, the NPC we've created in the previous tutorial sitting peacefully outside his shack. If the Player goes and talk to him he will ask for our help. He will say that there are some bandits that are bothering him and stealing in his house, and that shortly they will come back. Additionaly, he'll say that they often setup a camp near his shack. If the Player accepts to help him, the quest will start and he will have to go and clear the Bandit camp, then return to Uriel to let him know all the bandits died. Uriel will then reward him with 200 golds.
Creating the skeleton of the Quest
Let's go ahead and start developing our quest. The first thing you have to do is to organize your project, create a folder and name it "To Break The Quiet", we'll insert everything related to this quest inside this folder.
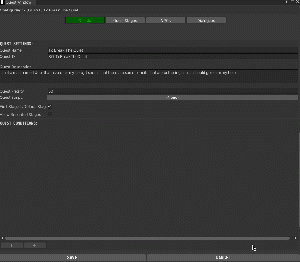
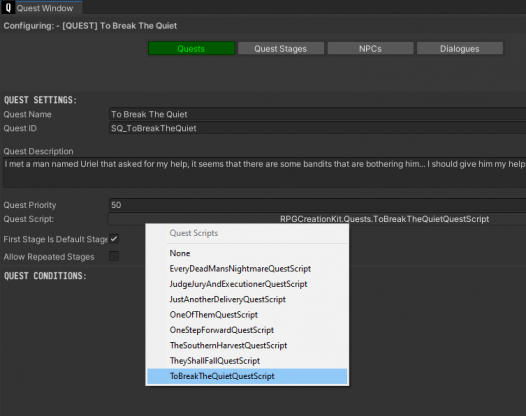
Go ahead and create a New Quest by right clicking in the project window -> Create -> RPG Creation Kit -> Quests -> New Quest and name it "- [QUEST] To Break The Quiet", then open it in the Quest Window by clicking "Configure Quest" in the Inspector.
Set the name, ID and description of the quest, I'll have:
Quest Name: To Break The Quiet
Quest ID: SQ_ToBreakTheQuiet
Quest Description: I met a man named Uriel that asked for my help, it seems that there are some bandits that are bothering him... I should give him my help.
We don't need to move anything else for now, switch to the "Quest Stages" tab and right click in the list on the left, then click "New" to create a new Quest Stage. Insert the ID of this stage to be 10 and now we have to configure the Quest Stage on the right.
The description will be: Learn more about the Bandits that are bothering Uriel, and I will also check Display Log Entry, because I want this Description to show up on the screen.
Then go ahead and create a new Quest Stage, it will have as ID 20 and the description will state: "Kill all the bandits in the camp West to Uriel's shack". I'll still have checked the Display Log Entry because it is an objective I want the Player to see.
Create another stage, Stage 30 and set its description to be: Speak to Uriel to collect your reward, again, this will have Display Log Entry set on true. This one will have the checkbox Complete Quest set to true, since when this stage will be completed, the quest will end.
Now if we analyze those three stages, when played sequentially they describe exactly our quest.
We're done creating the Skeleton of the quest and we now have to create the implementation of it.
Implementation - Entry Point and Dialogue Creation
The first thing that we are going to build for this quest, is Uriel's Default Dialogue, more specifically, this is the dialogue that Uriel will have as soon as he gets instantiated, and the first that will run if the Player speaks to him. The reason why we start with the Dialogue, is that it is the Entry Point of the quest, that simply means it is the thing that will make the quest start.
Create a new folder inside the previous one named "To Break The Quiet" and create a new Dialogue by right clicking in the project window -> Create -> RPG Creation Kit -> Dialogues -> New Dialogue Graph.
An empty Window will open, close it for now and let's rename the file to "[DIALOGUE] UrielsDefaultDialogue". In the Inspector we have to insert an ID for this dialogue that must be unique and not shared with any other ID. I'll insert "DIALOGUE_UrielsDefaultDialogue".
Now you need to do the most important thing, which is Updating the Databases. Check for the tool-bar on the upper-left part of the screen, click on "RPG Creation Kit -> Update All Databases". A short loading will happen, and your new dialogue will be included in the Dialogue Database, also check the console for any error. If there's any, you may have inserted an already used ID, so change the ID and try again.
Now you can double-click on the file or click "Edit Graph" from the Inspector to reopen the Dialogue Window and start making the dialogue.
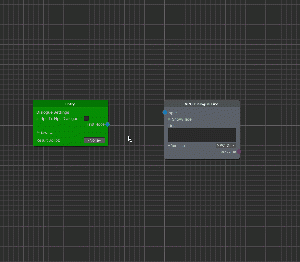
We've seen how Dialogues work in the previous tutorials, every Dialogue must start with an Entry Node, so let's add it.
Right click anywhere in the Window -> Dialogue System -> Entry, and a new Entry node will appear. We don't need further action for it, so let's go ahead and keep creating our Dialogue.
I want Uriel to greet the Player as soon as the Dialogue start, and then ask for help. We can have the NPC saying a line with the "NPC Dialogue Line" node, so let's add it. Right click anywhere in the Window -> Dialogue System -> NPC Dialogue Line.
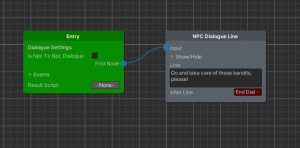
That will add the node inside the Graph, now to make this NPC Dialogue Line the first thing that happens when the Dialogue starts, we need to connect the First Node of the Entry to the Input of the NPC Dialogue Node. You can do this by clicking and holding on the blue "First Node" dot and dragging the line to the blue dot "Input".
Now what we need to do is to fill the information inside the "NPC Dialogue Line" node.
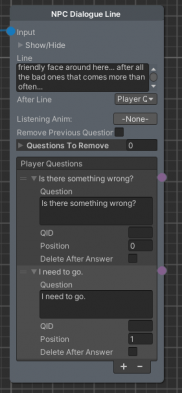
The only thing that is currently displayed is the "Line", which represents the text that will be displayed to the Player while the NPC speaks this line.
So let's fill it, I'll write inside:
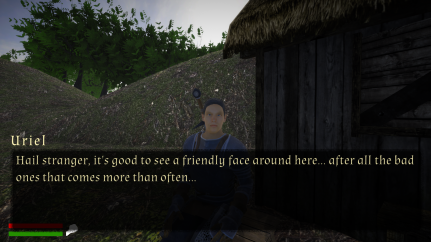
"Hail stranger, it's good to see a friendly face around here... after all the bad ones that comes more than often..."
Now you can click on "Show/Hide" to unveil hidden settings.
You can ignore most of the things for now, the "Plain Line" will be set to false since we want this dialogue to stop the Player and use the full interface, it will trigger no Events. You may just want to set the "Line Time", which is the time in seconds that will pass before this line is considered spoken.
Click again on "Show/Hide" to make the Node occupy less space,
What should happen next is that the Player will have to say something, for doing that we can use the After Line of the NPC Dialogue Line node, click on it and select "Player Questions".
More settings will appear, we can ignore everything for now and jump to the "Player Questions" list, click on the + button two times to add two things the Player will be able to say.
You'll notice that Elements will appear in the list with a violet dot right to them.
Let's open Element 0 by clicking on it.
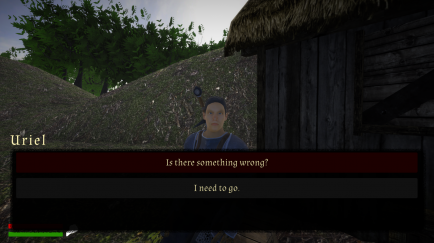
Here you can configure what you want to say and how questions should appear in the UI. For Element 0 I'll have as question "Is there something wrong?" and it will have the Position 0, that means it will always be on the top of the Dialogue Interface.
For Element 1, the Question will be "I need to go" and the position will be 1.
The checkbox "Delete After Answer" is used for deleting the question from the current dialogue interaction after it has been selected, it is not needed for now.
Perfect, what we need to do now is to tie those things the Player says to responses of the NPC and change of state.
In both cases, we want Uriel to reply, so I'll add two more NPC Dialogue Lines and connect each one with a Player Question.
I want to test if everything is good so far, so I'm going to set the After Line for both to "End Dialogue", so that we can have a correct graph (a correct graph is a Graph that doesn't have empty ports or references and generates no error while being executed) without adding more content to it.
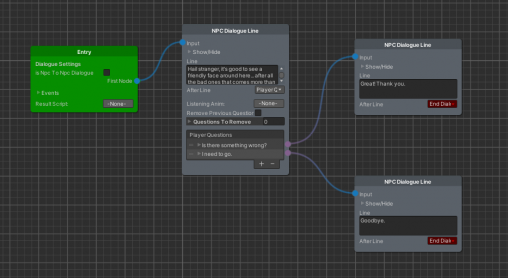
The first NPC Dialogue Line will make the NPC say "Well... there are those bandits that are bothering me... but I'm not sure I should tell you" while the second one will make him say "Goodbye.".
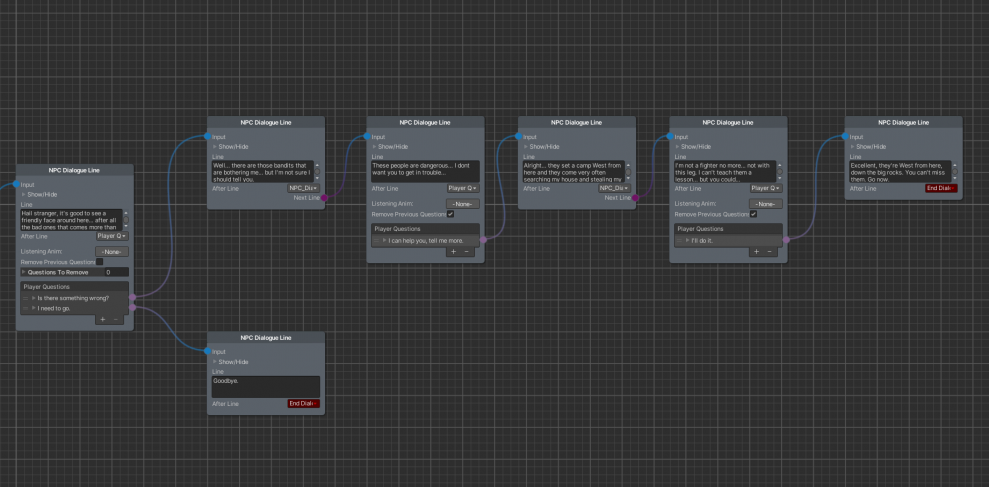
If you did everything correctly so far, you should have this situation:
Hit CTRL+S and close the Dialogue Window.
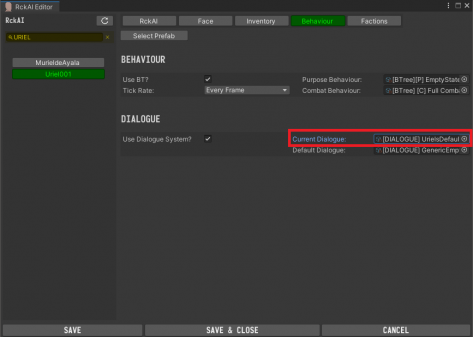
What we need to do now is to assign this Dialogue to be the Default one that Uriel will use, so let's open the Rck AI Editor and let's search for "Uriel001".
Let's go straight to the Behaviour tab and let's change his Current Dialogue to the one we just created:
Click SAVE and close the Window.
At this point Uriel has the Dialogue we've just created, and if we'll talk to him he will use it.
So we can load the Main Menu scene and load a savegame prior to when we've meet Uriel (or create a new one). If we reach him and speak to him the dialogue will flow just as we would expect. Make sure to make a savegame now, you'll use it later when the Dialogue will be modified in the next steps.
Implementation - Quest Dealer
We've verified that our Dialogue works perfectly, now all we need to do is to keep adding content to it until it satisfies us.
So let's open the Dialogue again in the Dialogue Window.
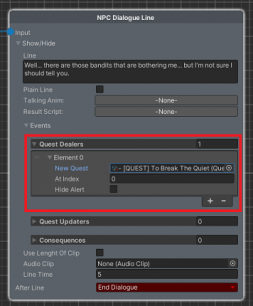
What we should expand is the line that says "Well... there are those bandits that are bothering me... but I'm not sure I should tell you". In particular, I want this line to be the Quest Dealer, that means that as soon as this dialogue starts to get spoken, the Quest will start.
To do that let's expand the NPC Dialogue Line, click on Show/Hide and we are going to add a new Quest Dealer. Selecte the "New Quest" to be the one we've created and leave all the other settings to default.
Try to load the savegame now, if you select "Is there something wrong?" as soon as the NPC will start speaking, the Quest will be added and the objective displayed. Surely, nothing happens after that, the dialogue just ends, and if you keep talking to him you'll have a bug, the quest will be added two times.
We certainly don't want that, so we need to make sure this line gets played only once, and we can do that by continuing building our dialogue.
At this point we really just have to add NPC Dialogue Lines and Player Questions to form the dialogue.
Implementation - Stage 10
The Stage 10 starts as soon as the quest gets added, and it will be completed by continuing to speak with Uriel.
For this stage, I'll have Uriel describing the bandits and how they tried to attack him, after he'll do that, the quest will be updated since we will have completed this Stage 10, which was "Learn more about the bandits that are bothering Uriel" and the current stage will be Stage 20, which asks the player to kill the bandits inside the camp.
To do that change the After Line of this NPC Dialogue Line to be "NPC_DialogueLine", this allows us to make the NPC say multiple lines back to back. Add a new NPC Dialogue Line inside the Graph and connect it with the Next Line dot, then insert the text that you want Uriel to say.
At this point you just have to use NPC Dialogue Lines, After Lines and Player Question until you come up with a situation like this:
As you can see the Dialogue is pretty straightforward, and we want the quest to progress as soon as the last NPC Dialogue Line is played.
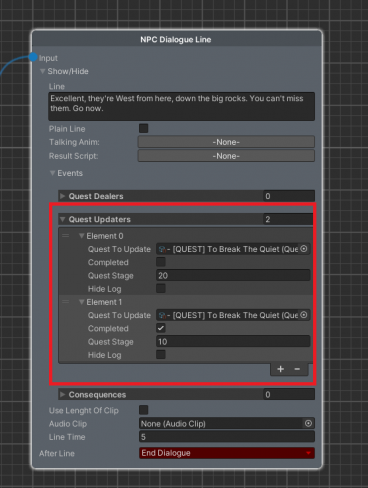
So what we'll do is adding Quest Updaters to it.
Click on Show/Hide and in Events add 2 Quest Updaters, one will be needed to complete the Stage 10, the other will be needed to set the current Stage to 20:
With this done, go back in the game, if everything is setup correctly when you'll go through the dialogue those things will happen:
- Quest will be added.
- Stage 10 will be the current stage.
- Stage 10 will be completed completed while speaking.
- Stage 20 will be the current stage.
But there's still a problem, when the dialogue ends, if you speak to Uriel again, he will still say us the same thing, and if we keep going on with the dialogue, the quest will be added again causing a bug, or at least a behaviour we certainly don't want.
And it's reasonable, because we've never told Uriel to change his Dialogue.
To solve this, we simply have to make Uriel change his Dialogue as soon as the previous one is completed, we can do this directly in the Dialogue Graph, using the Change Dialogue Node.
Before adding this node, we need to create the Dialogue we want to switch to.
Create a new Dialogue Graph, name it "[DIALOGUE] UrielsWaitingForBanditsToBeDead", set the ID to "DIALOGUE_UrielsWaitingForBanditsToBeDead" , update the databases, and then open it. We are going to create this Dialogue properly later, for now just insert just an Entry Node and one NPC Dialogue Line that says anything and has as After Line "End Dialogue".
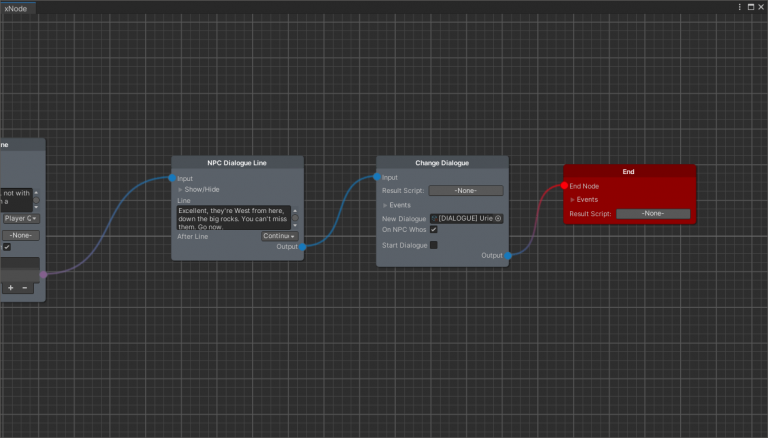
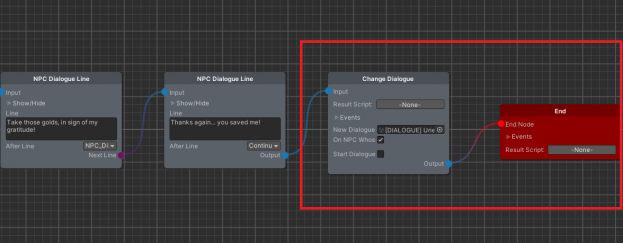
Now let's get back to the UrielsDefaultDialogue, the Change Dialogue Node will go after the last NPC Dialogue Line and it will be followed by an End Node. Notice that the Change Dialogue Node is set to change the dialogue of the NPC who's currently speaking to the one we just created (UrielsWaitingForBanditsToBeDead):
This is the standard way to make unique dialogues that needs to be trigger only once, you will find this structure in most of the dialogues of the demo.
Boot the game again from the Main Menu, reach Uriel, speak to him and take his quest. If everything was done correctly, he will only give you the quest once. After the Default Dialogue ended, he will just say one dialogue line (the one you created inside the DIALOGUE_UrielsWaitingForBanditsToBeDead) if you keep talking to him.
Implementation - Stage 20: The Bandit Camp
Great, we now have a quest and a objective, but we don't have the bandits that Uriel is talking about.
We need to create them and place them somewhere. Let's place them in the corner of the Cell "Virrihael(-2,-2)". You can just setup the place, put some props, furniture or whatever you want.
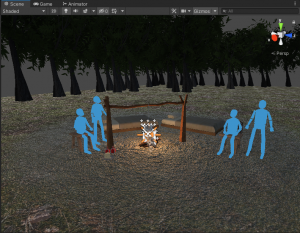
I've setup a nice little camp like this:
Alright great! Now all we need is to create and place the Bandits in the world. You learnt how to do this in the previous tutorial, the process is not different by any means. Create two NPCs and equip them as you please. Set their IDs to be unique and remember it, we'll use it later.
I'll have for the first NPC "UQBandit001" and for the second "UQBandit002". UQ stands for "Uriel Quest", I tend to use those prefix/suffixes to make sure the IDs will always be unique. Sure you can name them just "Bandit001", but in the future you may add a lot more bandits and lose track, or even worse, end up with duplicated IDs. I'll also set their faction to be "BanditFaction", so they will attack the player as soon as they him. You can view the NPCs "BanditInCamp001" inside the Rck AI Editor to see how I've setup the bandits for the demo.
Great, now that you've created the NPCs, let's place them in the scene. Just drag and drop their prefabs into the scene
Note: the prefabs of the NPCs are inside the folder Assets/RPG Creation Kit/Prefab Library/AI - but you can access to a specifc NPC quickly by clicking on the "Select Prefab" button in the Rck AI Editor.
Update the cell, by clicking on the "CellInfo" GameObject and in the Inspector click on "Update Cell". You may notice that after updating the cell the NPCs prefabs go inside the "AI_Container" GameObject.
We now have the camp and the NPCs to kill, if you load any savegame and you'll reach that location, the two bandits will be there and if they are in the "Bandits" factions, they will attack you on sight. You may have this behaviour: the Bandits see you from a very far distance and you may want to reduce that distance. To do that, let's return in the cell where we dropped the bandits.
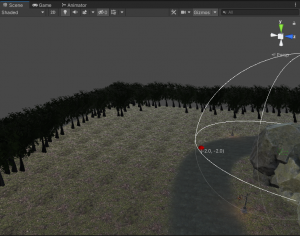
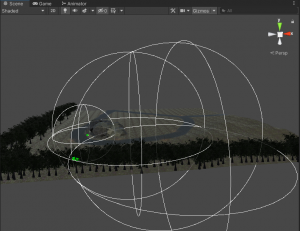
Notice the big white wireframed sphere, that tells us how far the NPCs can see, and they can clearly see too far. Indeed, it's likely that they'll go and attack the player even before he'll have a chance to notice them.
To reduce their sight, just click on the NPC, look in the Inspector for the "Rck AI" Component and click on the "Perception" tab. From there the values we have to edit are: Radius, Sphere Y Offset, Sphere Z Offset.
- Radius: represents the radius of the sphere, how big it is.
- Sphere Y Offset: moves the sphere on the Y axis (you should keep the default value):
- Sphere Z Offset: moves the sphere on the Z axis (you can set it to be 0 if you want the Bandit to be able to see the Player even if he's behind).
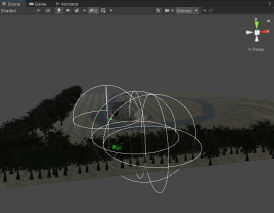
Play with those settings a bit and see how they modify the wireframe sphere. I'll set them to be:
Radius = 30
Sphere Y Offset = 1.25
Sphere Z Offset = 25
But you can obviously choose yours as you prefer. You can apply the changes to the prefab as well, so that the edit is permanent.
You should be all set now, reach the NPC and see if everything is alright for you.
Obviously if you tried to kill them the quest didn't progressed, because we haven't done that yet.
Implementation - Stage 20: The Quest Script
This section may look long, but it's because everything is explained meticulously, so do not be afraid!
It's time for a script! We've already seen how to update a quest when an NPC dies, that was in the A First Look tutorial, here we will see how to effectively create a new Quest Script from scratch that detects when an NPC (or more than one NPC) dies and updates the quest if it was meant to be updated.
The structure of the script is extremely simple, you could just replace the IDs to yours and it should work, but it is important that you get how scripting works because it is an essential component of the RCK.
Go in the Quest folder, right click in the Project Window and select "Create -> RPG Creation Kit -> C# -> Quests -> QuestScript.
Name it something meaningful, I'll name it "ToBreakTheQuietQuestScript", open it and let's take a look.
public class ToBreakTheQuietQuestScript : QuestScript
{
  // This will start running the CustomUpdate as soon as the quest starts.
  public void Start()
  {
     RunQuestScript();
  }

  / CustomUpdate runs once every (quest.questScriptExecutionDelay) seconds
  public override void CustomUpdate()
  {
     base.CustomUpdate();

     // Your code here
   }
}
The Quest Script has two parts, a Start and a CustomUpdate. Start gets called as soon as this Quest Script runs, hence as soon as the Quest starts.
CustomUpdate is called every questScriptExecutionDelay seconds, where questScriptExecutionDelay is a just a value that we can set to decide how often the CustomUpdate code will run.
As a matter of fact, that is the first thing we are going to do. By default every Quest Script runs every 5 seconds, but that's too much for what we need to do. That means in the worst case scenario the player will have the quest updated 5 seconds after having killed the bandits. Let's change that.
In the Start block type, before the RunQuestScript() call, add the line "quest.QuestScriptExecutionDelay = 1f;"
  // This will start running the CustomUpdate as soon as the quest starts.
  public void Start()
  {
     quest.questScriptExecutionDelay = 1f;
     RunQuestScript();
  }
With this line we've decided that the Quest Script will run its update every 1 second, which is a good compromise between performance and result.
The "quest" written there is the Quest Object that contains all the information about the quest, like the stage we're at, the questScriptExecutionDelay, the stages we already completed, the ones we failed and other things. If you type "quest." if you're using Visual Studio the Intellisense should let you see all the fields and property of the quest.
Let's take a step back and add the data we need to run this script. We know we need to access to the two NPCs, so we need two objects that represents them. To create them, simply add in the top part of the script, outside the blocks those two lines:
Rck AI bandit1;
RckAI bandit2;
public class ToBreakTheQuietQuestScript : QuestScript
{
   RckAI bandit1;
   RckAI bandit2;

   public void Start()
   {
     [...]
   }

   public override void CustomUpdate()
   {
      [...]
   }
}
We've just created two objects that will store the information of the bandits, and that information is accessible just like we've accessed the questScriptExecutionDelay before.
Okay now for the substantial part, we need a way to check if the two NPCs are alive, and if they are both dead we should update the quest. This is something we need to check constantly, so that code will go inside the CustomUpdate() block. Not only, this is something that we need to check constantly but only if the current stage of the quest is 20, so only if the Player's objective is killing the bandits.
The code we need to do the following is just that:
// CustomUpdate runs once every (quest.questScriptExecutionDelay) seconds
public override void CustomUpdate()
{
    base.CustomUpdate();

    // If the Current Quest Stage is 20
    if (quest.currentQuestStage == 20)
    {
        // If the bandit data has not been assigned
        if(bandit1 == null || bandit2 == null)
        {
            // Those two lines tries to get the NPCs, if they're loaded
            CellInformation.TryToGetAI("UQBandit001", out bandit1);
            CellInformation.TryToGetAI("UQBandit002", out bandit2);
        }
        else
        {
            if (bandit1.isAlive == false && bandit2.isAlive == false)
            {
                // This block runs if the bandit data has been assigned and both bandits are dead
                RCKFunctions.CompleteQuestStage(quest.questID, 20);
                RCKFunctions.SetQuestStage(quest.questID, 30);
            }
        }
    }
}
Let's get to it step by step.
The first block "if (quest.currentQuestStage == 20)" means "execute the following block only if the Player's Current Quest Stage is 20".
The structure if(...) else if (...) below is used to check if the bandits are loaded inside the game or not.
The first block if() runs if the bandits are not loaded and far away from the player, hence we can't get their fields and properties. If bandit1 doesn't contain the data we want, or if bandit2 doesn't contain the data we want, we constantly call the function CellInformation.TryToGetAI("UQBandit001", out bandit1); which tries to assigns to an object (which is bandit1) the respective data. You may notice two familiar things here, the ID "UQBandit001" and the bandit1 object we've created. If you've used a different ID for the bandit, you should replace it. If you used a different name for the object, you should replace it as well.
We obviously do that two times because we need two NPCs, and we need them at the same time. Notice the following line to be the same, but the only thing that changes is the ID and the object name.
The second block else {...} runs if the Bandits are loaded and near the Player.
Inside this block we check if their fields "isAlive" is false, so we check if they're both dead. If they are we call the two lines:
RCKFunctions.CompleteQuestStage(quest.questID, 20); // That completes the quest stage 20.
RCKFunctions.SetQuestStage(quest.questID, 30); // That sets the current quest stage to 30.
And we're done. The structure is the same for every other time you'll want to check during a quest if an NPC is alive or not. You can just literally copy and paste this code to another Quest Script and all you need to change is the IDs, the objects names and the stages.
You can view the whole script here.
Save the script and go back in Unity. Open the Quest with the Quest Window and set as the "Quest Script" the one we've just created.
Save, and get back in the game. Pickup the quest from Uriel, the reach the bandits and kill them, the quest will update shortly after to Stage 30, and you'll see the Stage 20 completed on the screen.
Implementation - Stage 30: Ending the Quest
So we did what Uriel wanted, the game tells us to return to speak to Uriel, but if we do that all he says is the same line over and over.
You may already have guessed what we need to modify - we need to modify that Dialogue that contains that line he says over and over. More specifically we need to use a Condition, if the Current Quest Stage is 30 he will have to thank the player and complete the quest, otherwise he'll keep saying that line.
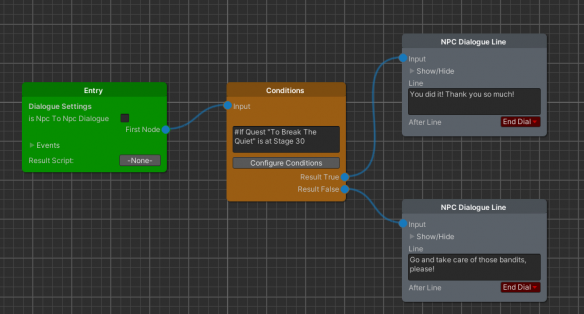
Open the Dialogue, we named it "[DIALOGUE] UrielsWaitingForBanditsToBeDead" and add a new Condition Node and a new NPC Dialogue Line.
The structure we need to create is the following:
When the Dialogue starts, we execute the condition, If the quest "To Break The Quiet" has as current quest stage the value of 30 we know that the bandits are dead, so we can redirect the Dialogue to the NPC Dialogue Line above and end the quest.
This is another structure widely used throughout the whole demo, and definitely a very useful one since it allows you to lock/unlock dialogue options with conditions, and those dialogue options are the same that will let your game unfold, change and progress.
Great, but only writing the Comment won't do it, we need to Configure the Condition Node to do what we explained.
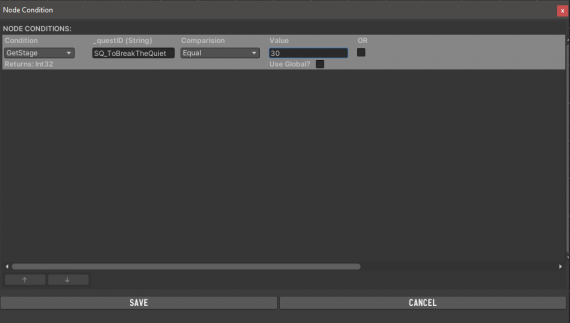
Click on Configure Conditions and a new Window will pop-up. Here you can insert all the conditions that needs to be matched for this Node to redirect the dialogue to Result True.
Right-click anywhere in the window and click on "New", a new entry will appear.
The Condition we need is the default one, it is "GetStage", this will return the Current Quest Stage.
Next we have to insert the _questID, as we decided in the beginning of this tutorial, it is SQ_ToBreakTheQuiet.
Comparision lets you select the comparison operator for the evaluation of the condition.
Finally Value is the stage of the quest, in our case it's 30.
So the Condition is read:
"If GetStage of the quest with ID "SQ_ToBreakTheQuiet" is equal to 30", and
Save, we've now set the condition. If it will be matched (so if the Player is on Quest Stage 30) the dialogue will be redirected to the Result True port, otherwise if the condition check will fail the dialogue will be redirected to the Result False.
You can load a savegame and play the whole quest, if you speak to Uriel while on Stage 20 he should say "Go and take care of those bandits, please!". After you've killed the bandits, when you go back to Uriel and talk to him he should tell you "You did it! Thank you very much".
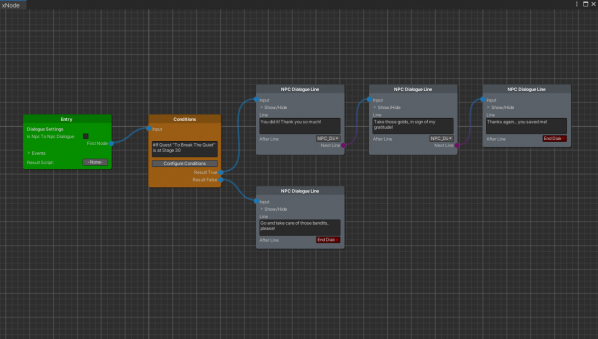
Now the last thing we need to do is to make that line complete the quest, and why not, give a reward to the Player. We can also extend the dialogue a little bit I'll have as the dialogue this:
And in particular the behaviour I want for the NPC Dialogue Lines is:
"You did it! Thank you so much" -> Nothing should happen.
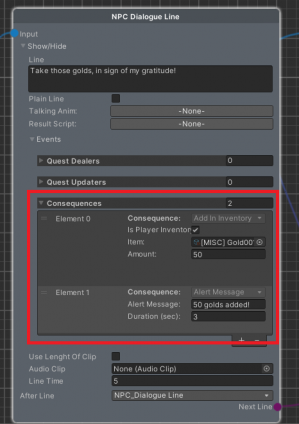
"Take those golds..." -> Player shall receive 50 golds and be warned they've been added to his inventory.
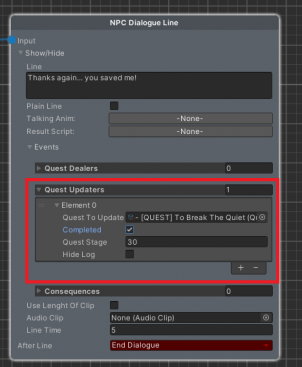
"Thanks again.... you saved me!" -> The quest gets completed.
So click on Show/Hide on the second NPC Dialogue Line, we are going to add two Consequences: Add In Inventory and Alert Message, the first one adds the Golds to the Player's Inventory, while the second one shows an Alert Message for the Player.
Click again on Show/Hide to minimize the node, and let's open the third NPC Dialogue Line. We'll have to add a Quest Updater that completes the Stage 30, and completing a Stage that has "Complete Quest" checked, will complete the quest itself:
At this point, the quest and its implementation is completed.
However there's still a problem, which is the same as the Quest Dealer one, when the Dialogue ends if we talk again to Uriel he will still have the "[DIALOGUE] UrielsWaitingForBanditsToBeDead". So we need to do the same thing as before, creating a new Dialogue and let Uriel switch to it after the quest has been completed.
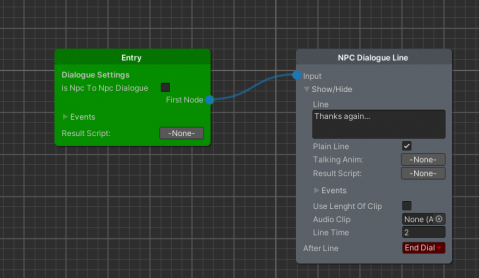
So go ahead and create a new Dialogue Graph, I'll name it "[DIALOGUE] UrielAfterQuest" and it will just contain a single Dialogue Line, that will make Uriel say "Thanks again...". But I do not want the whole Dialogue interface to appear, so I'm going to make this a Plain Dialogue by just having an Entry Node that redirects to an NPC Dialogue Line that has those settings:
Notice the Plain Line checkbox and the AfterLine set to EndDialogue - that's how you have a Plain Dialogue.
Update the Databases. Now the very last thing we need to do is to go back in the "[DIALOGUE] UrielsWaitingForBanditsToBeDead" and add a Change Dialogue node before ending the Dialogue, just like that:
You did it! With that done, the quest is completed and you should be able to play it from start to finish. Go ahead and do that! You may take a little break and then continue with the last two paragraphs.
And what if...
The quest works great, however there is a thing that could be ironed out. Remember in the A First Look tutorial, in the Extra section we've said that while making our quests we should always think of what the player could do and how we could go around the desired order of the things.
In the quest we made, we've assumed that the Player would meet Uriel before meeting the bandits. But what if your Player will kill the bandits before speaking or meeting Uriel in the first place? What will happen is that the quest will flow as intended, but once the Player reaches the Bandits, the quest will be updated automatically, because the Quest Script we've made will detect that the bandits are dead. It doesn't bug the game, but it feels not right.
What we should do is to be able to tell Uriel we killed the bandits before he sends us to kill them. And we can do that in the Dialogue with the help of the Conditions. If you got until here you could try doing it on your own, otherwise don't worry - just follow along.
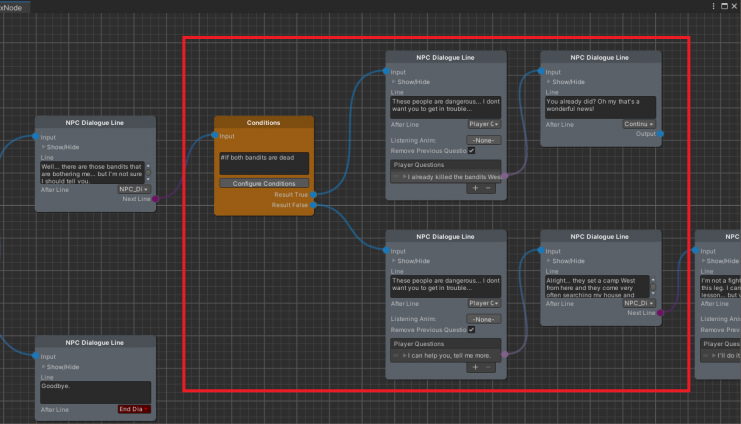
Open the "[DIALOGUE] UrielsDefaultDialogue" and reach the NPC Dialogue Line that allows us to say "I can help you... tell me more". What I want to do is to be able to pick another Player Quesiton that will say "I already killed the bandits West.".
To do what we ask, we need to reorganize a little bit the dialogue:
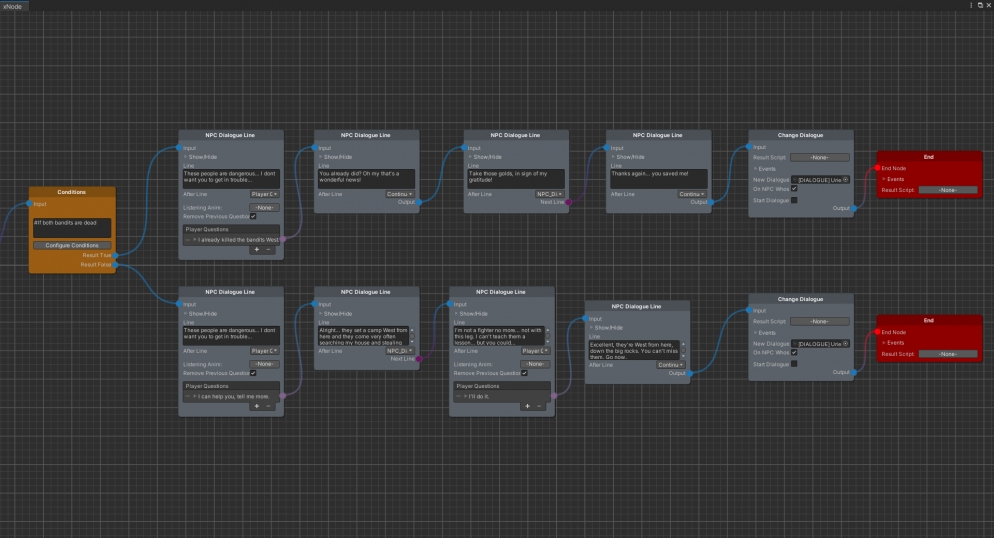
This structure lets us branch the Dialogue as we want, if the Bandits are dead the dialogue will be redirected above, where we can just complete the quest. Othewise if the bandits are alive the dialogue will go normally.
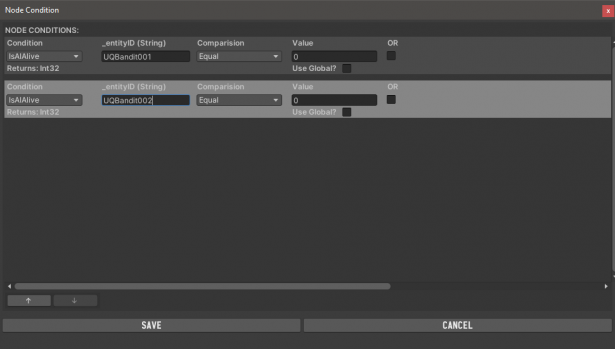
Click on Configure Conditions and let's set the conditions properly, we need to check if both NPCs are dead so we will use as a Condition "IsAIAlive", we are going to insert the IDs and the comparision and value will be "Equal 0" - which means the AI is not alive.
At this point, you only have to develop the dialogue on the "Result True" end, what I'll do is to literally copy-paste the NPC Dialogues Line we've made for the dialogue "[DIALOGUE] UrielsWaitingForBanditsToBeDead":
And that's it! The quest is now completed and it's robust, it will react accordingly to the player's actions. In the last section below we'll see how to add the Compass Markers, that will allow us to have the Red arrow pointing to the Bandit Camp if we're at Stage 20, and pointing at Uriel if we're at stage 30.
Files & Downloads
You can download all the files we've created for this quest here.
