Difference between revisions of "Creating a New Creature AI"
| Line 161: | Line 161: | ||
== Adding your Creature in the World == | == Adding your Creature in the World == | ||
Open a Cell with the Cell View | Open a Cell with the Cell View and add the "[CreatureAI] Skeleton001" in the scene. '''Update the cells''', and load the game. The creature should be there, and it should work as you'd expect. | ||
== | == Troubleshooting & Extra == | ||
If your Creatures are triggering you warnings in the Console like "Animator Parameter "isDrawn" was not found", you can suppress those by adding the said parameters to the Animator, even if they're unused. | If your Creatures are triggering you warnings in the Console like "Animator Parameter "isDrawn" was not found", you can suppress those by adding the said parameters to the Animator, even if they're unused. | ||
If you're getting errors in the console while attacking the Creature, make sure that the Creature AI Sounds are not empty. | |||
Revision as of 12:05, 25 April 2022
The Update 1.1 of the RPG Creation Kit introduced the Creature AI, which is a new type of AI Entity for the RPG Creation Kit built on top of the RckAI.
The Creature AI allows you to quickly setup any animated 3D model to be a AI Entity in the RPG Creation Kit, as opposed as the RckAI which requires you to setup a new Race and have your 3D models in a determined way.
In this tutorial, we are going to create the Skeleton featured in the Update video, made by IronicGame that you can download for free on the Asset Store.
This model, other than being super cool, comes also with even cooler animations - I suggest you download that asset and follow along with it during this tutorial, then you'll be able to setup any other 3D Model you want.
Setting up the Animator
The first step we're are going to take is to setup the Animator.
Before we start, you can download it from this link to see how the transitions and the states are made.
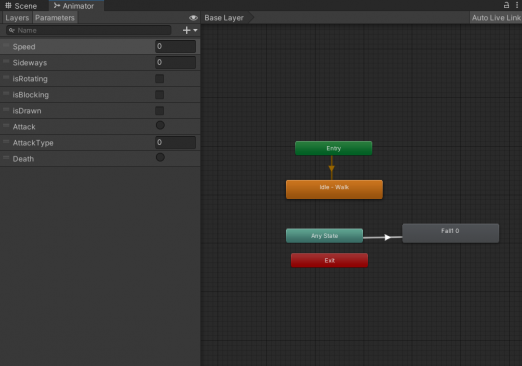
Open the SkeletonAC animator and let's focus on the "Parameters", every Animator you are going to make will need to use the same Parameters names and types as shown in this picture:
You'll also notice in the image above that I've only two States for the Default Animator Layer, "Idle-Walk" which is a BlendTree for the movement animation, and the "Fall 0" which is for the Death animation (if we're not going to use the ragdoll).
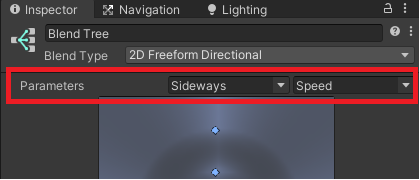
Before moving on, open the "Idle-Walk" BlendTree and make sure to set parameters to the just created "Sideways" and "Speed":
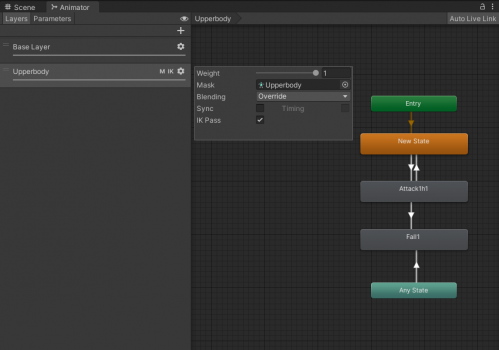
Now let's move to the "Layers" tab of the Animator, we have to add a new Layer (by right-clicking), let's call it "Upperbody". Click on the gear icon and set the Weight to 1, the Mask to Upperbody, the Blending to Override and you may want IK Pass as well.
The Upperbody is composed of:
- New State: an empty state (must be the default).
- Attack: the attack animation.
- Fall: the same death animation of the Base Layer, used to make sure it gets played on the Upperbody too when the Creature dies.
Of course those transitions are parameterized, and they use the parameters we've created above. Make sure to look at the file above to see how the transitions are made.
Just a word on the Attack animations, in this case there is only one, so it was not meaningful to use the "AttackType" parameter, but keep in mind that your Creatures can chain attacks and you can control those with that parameter.
Setting up the Animations
The only job to get done to setup the animations is to set the Animation Events for the attacking animations, just like the Attacks of the RckAI.
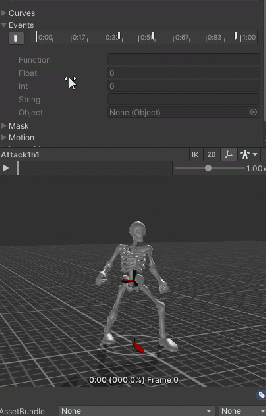
Select in the Project Window the Attack1 animation and in the Inspector reach for "Events", you can add an Animation event by Right Clicking in the Timeline and clicking on "Add New Animation Event". For the Attack to work, you need at least three:
"AttackAnimationEvent": that should be where the attack is being executed (for example the blade has just started swinging).
"EndAttackAnimationEvent": that should be where the attack has ended (the swing ended).
"ResetAttackStateEvent": that should be at the end of the animation, it will tell that another attack can be performed.
Refer to the GIF below:
Setting up the 3D Model
The next step is to setup the 3D Model. This is probably the most important part and the easiest one to forgot to something on, so let's go with order.
Drag and drop the "SKELETON" prefab in the Scene and remove the components "Animator" and "Player Controller" attached to it. It is important that the Creature AI model is structured in this way:
- SKELETON (Parent Object)
- Bip01 (Armature)
- Mesh (Skinned Mesh Renderer)
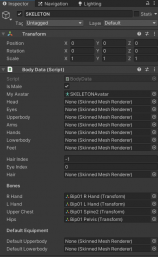
Add the "BodyData" Component to the "SKELETON" GameObject and set it up, the fields you have to assign are just:
- My Avatar
- R Hand
- L Hand
- Upper Chest
- Hips
While the others can remain blank. Refer to the Image on the right:
Next-up, add a "Ragdoll" Component and leave it for now, we will come back to it later. (Add it even if you're not going to use Ragdoll)
Finally add an "AI Sounds" Component and insert the AudioClips you wish for your Creature's sounds.
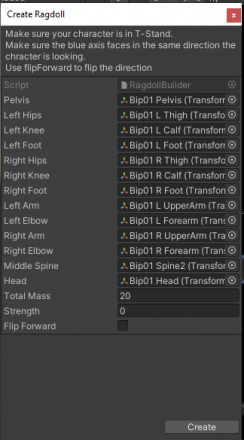
Now it is time to create the Ragdoll, and we can do that with the Unity built in tool. Click in the top-bar on "GameObject->3D Object->Ragdoll and configure the window by inserting the correct bones of the Armature:
And click on Create.
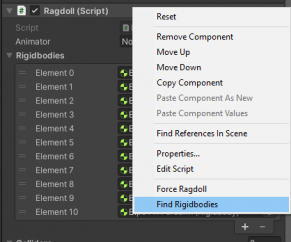
Now if you're going to use the Ragdoll, now it's the time to come back at it. Look at the "SKELETON" GameObject, in the Inspector, and Right Click on the "Ragdoll Script", then select "Find Rigidbodies". That will fill the Rigidbody Array with the rigidbodies we've just created.
Great, now we have to designate those Rigidbodies to be the Body Parts of the Creature, that will make it hittable.
Select in the Hierarchy all the GameObjects we've put in the Ragdoll Window before and do the following:
- Change their Tag to be RPG Creation Kit/BodyPart
- Change their Layer to be BodyPart, and make sure to click "No, this object only" when asked to set the layer for all child.
- Add Component "BodyPart".
We have almost finished, now go through every GameObject and select the correct "This Body Part" in the "BodyPart" Component. You may want for the "Bip01 Pelvis" to select "Chest", for the "Bip01 LThigh/Calf" to be "Leg", and so on. What this does, is to designate the parts used for Locational Damage.
It is time to add the Looting Point. Add an Empty GameObject to "Bip01 Pelvis" (which is the Hip bone of the Skeleton), name it "LootingPoint" and do the following:
- Add a Capsule Collider Component and scale it accordingly to Creature's Size. Then make sure to set it as a Disabled Component.
- Add a Rigidbody Component and uncheck "Use Gravity", "IsKinematic" must be checked.
- Add a Looting Point Component, leave everything blank but set the "LCollider" to be the Capsule Collider we've just created.
- Set the GameObject tag to be "RPG Creation Kit/LootingPoint"
The last step is to add a GameObject that will designate where the head of the Creature is.
So go inside the Armature all the way down to "Bip01 Head" and add a Cube GameObject as a child of it and do the following:
- Rename it "HeadPos", without the double quotes. This is required.
- Set its Tag to "RPG Creation Kit/IgnoreWeapons".
- Set its Layer to "NPC".
- Set the Box Collider component to be Trigger.
- Add the "AI HeadPos" Component.
- Remove the Mesh Renderer and Mesh Filter.
And we have finished. Make sure to make a Prefab out of the SKELETON GameObject we've been working on and name it something meaningful, like "SkeletonCreature GFX". Also make sure the Transform of the Prefab is 0,0,0 for both Position and Rotation. I'm also going to set it's scale to be 0.365 on each axis, because by default he's too big.a
We're ready to move on, If you did something wrong you'll know in the next section and you'll be able to fix it.
Creating the Creature AI
We now have all the elements to be able to create our Creature AI, and we do that in a very similar way we create NPCs.
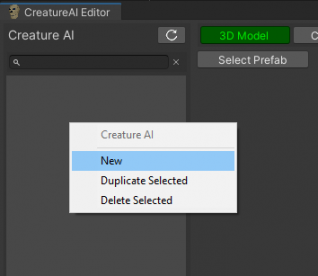
When Creating or editing a Creature, you will use the Creature AI Editor. You can open it by clicking on the top-menu "RPG Creation Kit -> CreatureAI Editor".
Right click in the left-list, while not hoovering on a button, and select "New":
This will add a new element in the list at the very top of it, named "_New_CreatureAI". Click on it and let's configure it.
The first tab, "3D Model" is where you have to assign the prefab "SkeletonCreature GFX" we've just created. Do it now, and at this point you'll know if the model is correctly setup. If it is, you will have a preview of him without any further message. If there's something wrong, you'll see an error box at the bottom of the model preview - that means you did something wrong or missed something in the configuration of the 3D Model.
Move to the "Creature AI" tab and let's edit the Entity ID, which is the ID of this particular Skeleton.
I'll have:
ID: Skeleton001
Name: Skeleton
If you're wondering why I always add '001' at the end of every ID, it's because of two things, the first one is that If I look at it I can instantly tell it is an ID, the second thing is that you may want more than one Skeleton in your game - so if you want to add another Skeleton you can just Duplicate this Creature AI and change the ID to Skeleton002.
Next, assign the Animator Controller to the "SkeletonAC" Animator we've created at the beginning of this tutorial, adjust all the other settings on this tab as you may like and let's move to the Inventory tab.
In the "Inventory List" you can add all the Items you want this Creature to carry, usually you give them few golds so that the Player can loot them. For the "Defaults", you here assign the Weapon this Creature will use. Note that this does not give the Creature any weapon, because Creatures must come with the Weapon as a part of their 3D Model (or they have no Weapon Item at all, like wolves), but it sets the Damage the Creature does and the Attack Types they can do.
Move to the Behaviour Tab, here you'll set the Behaviours of the Creature, I usually give them as the Purpose the "Roam(TargetVector)" Behaviour that allows them to wander around the world. While for the Combat Behaviour, leave it as "Full Combat Forced".
Last Tab, Factions, allows you to set this Creature in Factions, by default all Creatures belong to the "Creatures" Faction, which is hostile to the Player only.
You may add a "Skeleton" faction and make all the Skeletons become to that faction, then you may create the "Wolves" factions and put all the Wolves inside that faction, and decide that those factions are hostile and so Skeletons will fight Wolves if they meet each other.
We're done, click on SAVE, and close the window.
Adding your Creature in the World
Open a Cell with the Cell View and add the "[CreatureAI] Skeleton001" in the scene. Update the cells, and load the game. The creature should be there, and it should work as you'd expect.
Troubleshooting & Extra
If your Creatures are triggering you warnings in the Console like "Animator Parameter "isDrawn" was not found", you can suppress those by adding the said parameters to the Animator, even if they're unused.
If you're getting errors in the console while attacking the Creature, make sure that the Creature AI Sounds are not empty.
