Creating Your First Worldspace
In this article we are going to create a completely new worldspace that could be the starting point of your own world.
You should have completed the Getting Started section before following this tutorial.
Introduction
As you may already know, a worldspace can be either an Interior Worldspace or an Exterior Worldspace.
Creating an Interior Worldspace is just a matter of creating the worldspace file and populating it with Interior Cells, you've learnt to do this in the Creating Your First Cell tutorial and is not a big deal.
Creating an Exterior worldspace however is where more work needs to be done in order to properly set the worldspace and its cells to be streamed as the player walks by, and that's what this article is going to cover.
Before going forward, I'd like to clarify one thing:
The RPG Creation Kit features a World Streaming system that allows you to split your massive world in chunks and have them loaded only when strictly required, this is one of many ways to stream a large map, and if you'd like to roll on your own solution where you have just one massive terrain and stream on top of that, you can totally do that. In this case, you just need to create an Exterior Worldspace with just one Cell that represents your whole world, it will be then your streaming system that will make the streaming happen.
Anyways, the RCK World Streaming is the "vanilla" way of doing it, although it doesn't currently support (at v1.2 time) distant cell rendering, it will be supported in the future, and I plan to expand it to the point where you shouldn't want to use anything else.
Creating the Worldspace File
The first step is to create your new Worldspace file.
Select a folder you'll put all the stuff we're going to create for the new world and right click in the Project Window:
Create->RPG Creation Kit->Cell System->New Worldspace
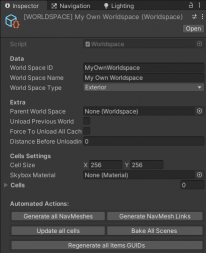
A new Worldspace file will be created, rename it to something like "[WORLDSPACE] MyOwnWorldspace" and let's configure it in the Inspector straight away: setting the Worldspace ID, Worldspace Name, Type and Cell Size is all you need to do for now.
Take a moment to pick the Cell Size, this is the size of one chunk of the world (a single terrain). All terrains will need to have the same size in order to be properly connected and streamed, depending on your goals and target hardware, you may select a big number if you plan to have not too dense areas each on close to the other, otherwise you should pick a smaller size like (128,128).
Creating the Center Cell
The way I recommend creating your world, is to start by laying out terrains, having enough to need streaming, and then adding them as you'd need. A good convention is to use a coordinate system on the X and Y axis, starting from the center (0,0) the cell (0,1) will represent the cell that is up one Cell Size from the center cell, the cell (1,0) is right to the center, and so on. This is the same metric used in the Demo world.
To do that, we need to create the Center Cell first.
