Creating a New Race
In this tutorial we'll discuss an important topic you sooner or later will want to face when working with the RPG Creation Kit, which is Races. Before going on, you should have completed the Getting Started section, and at least tried to create a new armor item for the default race. These tutorials will give you a proper understanding on how the RPG Creation Kit works so that you should not have any problems following along with this advanced topic.
A Race is essentially a complex humanoid 3D Model that acts as a base for your humanoid characters. Races define:
- Basemesh: the actual 3D Model.
- Eye Colors: set of materials you can use to make your characters eye color different.
- Hair Types: set of 3D Models you can use as hair for your characters.
- Blendshapes: used to deform the basemesh and create different characters.
You want to use a Race when you want the Player Character to be able to use a specific 3D model, or you want an RckAI to have all the functionality the player has like the Equipment System and Character Customization.
For AI that is simpler, meaning they don't need customization, hair or blendshapes, like normal creatures, you should use Creature AI.
A Race define both a Male and Female version of that Race, but you can also just create one of them and leaving the other blank if you only need one gender.
Premises
Before we start, as the current RPG Creation Kit Version 1.9, you can create as many Races as you want. However, in order to make sure the Equipment System works correctly you need to follow two strict rules:
- All 3D Character Model has to use the same rig.
- The 3D Character Model mesh has to be split in:
- Head
- Torso
- Arms
- Hands
- Legs
- Feet
This is very important, and missing this step will result in your Race probably being playable and usable, but the Equipment system will not work with it correctly.
I recommend to either use the same rig as the Human race we use in the RCK, or to start from scratch by using one of your rig and sticking with it for all of your characters. Bear in mind that also the equipment models themselves have to use the same rig, as we've seen in the Creating a New Armor Item tutorial. If you haven't read that tutorial yet I strongly recommend doing it now before proceeding, and to try to create an equipment Item for the RCK default character before attempting to create a new Race.
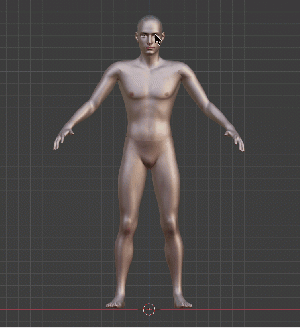
In this tutorial I will use a generic 3D Model, with his own rig and with the mesh that is in one piece, so we will see all the steps in order to convert it in a RCK-friendly model. I will use the RCK default character's rig, so I'll need to convert the new 3D Model to be able to use that rig. I'll also use Blender, although if you're familiar with another software the steps should be pretty similar.
First thing I'll need is the RPG Creation Kit Basemeshes's Rig, that you can find at this link.
Step 1: T-Pose, A-Pose?
The first problem you may stumble upon is the following: your rig is in A-Pose, but your character is in T-Pose (or vice-versa). Also, you may have both your rig in T-Pose or A-Pose, but they may be a little bit different.
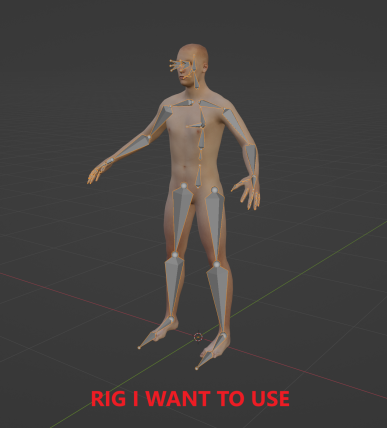
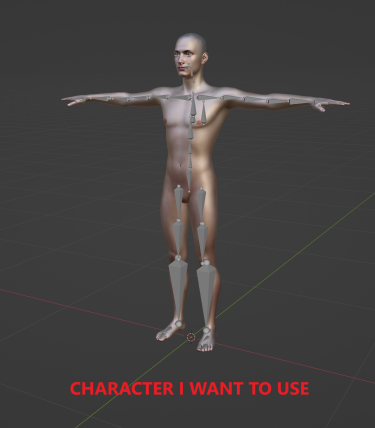
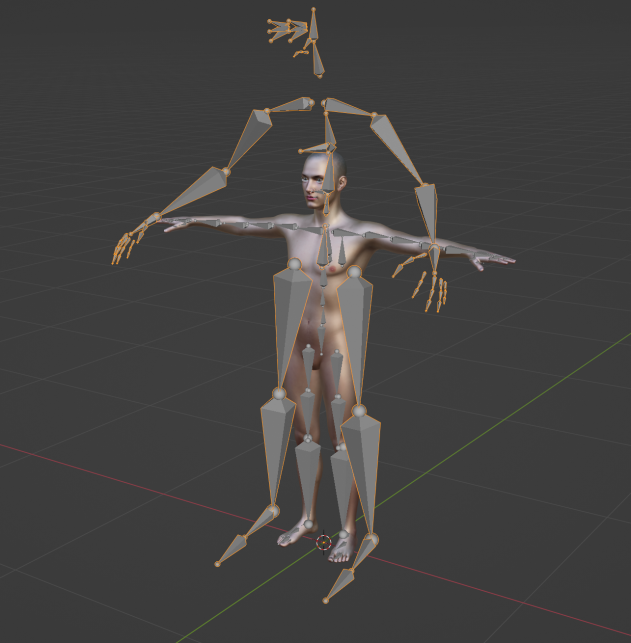
In my case the 3D Model I'm using is in T-Pose, and the rig I want to use is in A-Pose:
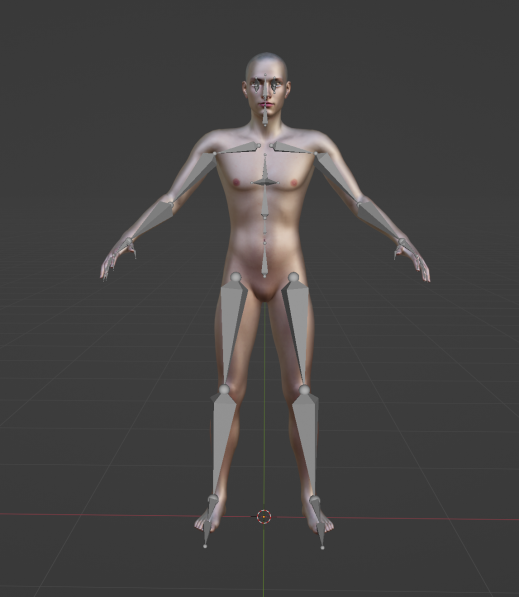
As you can see, the rigs are quite different, and the resting pose is as well. This is probably your case too, and it will be the case for every Race you'll want to setup. So the first step is to convert the resting pose of the character to match the rig I want to use.
Open your new 3D Model character in Blender and let's append the Rig from the RCK Human basemeshes.
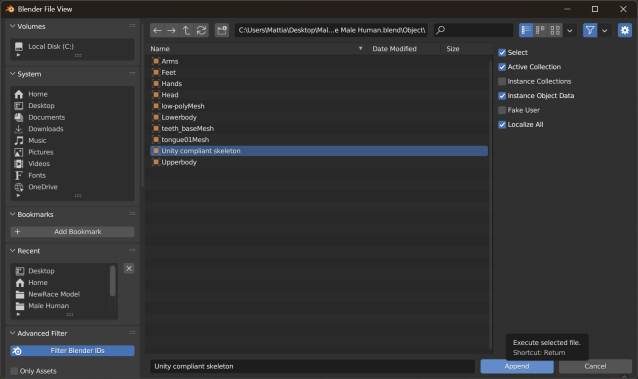
Click on File->Append, then locate the "Base Male Human.blend" file and click on it. Go in the 'Objects' folder and click on "Unity compliant skeleton". Then, click on the blue Append button:
You will import only the rig, which is what we're looking for, and you'll be presented with a situation similar to this:
Now, depending on your 3D Character model, the rig may be bigger or smaller, the point is this: while in object mode we need to scale the original character rig in order to match in size with the RCK rig we want to use. A good measure is the eyes bones, make them match with your character:
As you can see here, the eyes bone matches with the character, which means the size is correct, and I've also rendered the original rig as black sticks instead of octahedral. This will come handy soon.
Once you did this, make sure to click on the character's rig we've just resized and Apply All Transforms by clicking CTRL-A -> Apply All Transforms (while in Object Mode).
Now, the objective is to set the resting position of our model such that it matches the A-Pose rig we want to use.
So now what you need to do select the original character rig (drawn as sticks) and go into pose mode, then, you'll have to move the bones until they match the rig we want to use (now the only one drawn as octahedral).
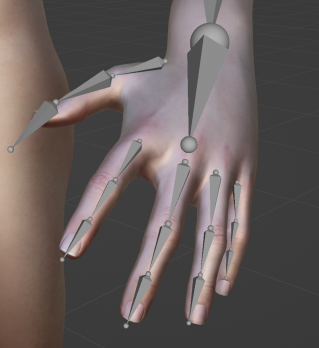
You should both rotate and move the bones (by pressing G) in order to achieve a correct alignment, especially for the hands and fingers. Do not be afraid to stretch the model if it's needed.
My advice is to work on only one side of the character and then mirror the pose for the other side. You can also use 'X-Axis Mirror' which is super useful.
Apply extra patience to align the fingers of the hand, it's a process you only have to do once and if it's done poorly it will have its consequences later.
During my process, I found out that it's better to align the spine and chest first, then the legs and at the very end the arms and hands.
Anyways, here's my finished result:
Now for the last thing to do is to apply the original armature, in order to set this pose as the model rest pose.
Select your mesh and in the modifiers window apply the armature modifier (of the original rig).
Now we can delete the original rig, nothing should break and the 3d model should keep this pose we've just made.
Last thing is to parent the new rig with the mesh, click on the mesh first, then shift select the armature and press CTRL+P, "With Automatic Weight" should give a good enough result, which you can always modify later.
The hardest and maybe the most annoying part is done!
Step 2: Splitting the Mesh
Now we will split the mesh in the 6 sections I've mentioned before:
- Head
- Torso
- Arms
- Hands
- Legs
- Feet
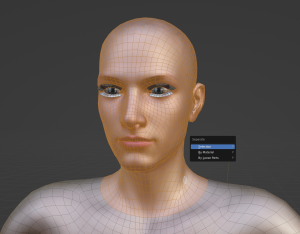
You can very easily do that by going in Edit mode, selecting the vertices of each section, and then click 'P' to separate. Select Separate By Selection.
Repeat this process for every part, you can use the RCK basemeshes as reference for the split points.
If your model also have eyes, mouth, tongue, eyelashes, just keep them as separated meshes.
If you want, you can also add blendshapes for the head mesh, in order to be able to create different versions of this model which will allow you to create different NPCs.
This step is optional, but you probably don't want the very same character for different NPCs, so creating different blendshapes that allow you to scale/move the vertices of the head is recommended.
You can always do it later, I'll just create three blendshapes:
Eyes Up/Down
Nose Up/Down
Lips Up/Down
In this way I'll be also able to show you the blendshapes edits in the RCK AI Window later.
Our model is finally ready! For the next step, we'll export the model and import it in the RPG Creation Kit.
.
.
Step 3: Exporting the model
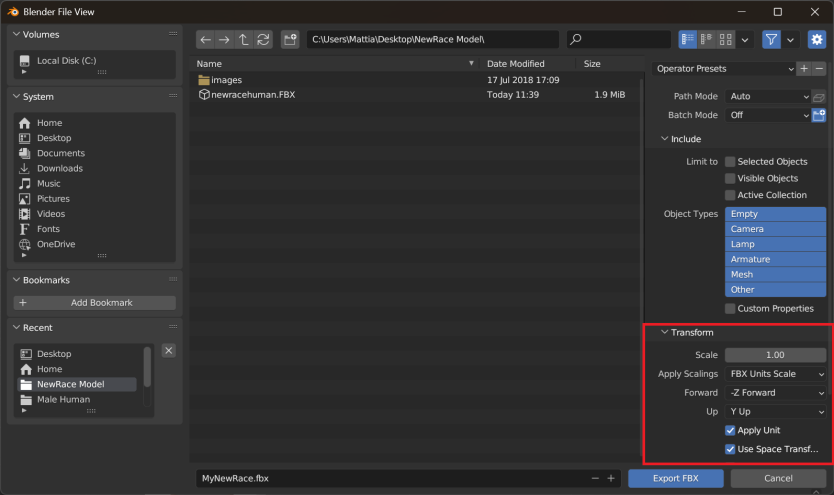
Simply export the 3D Model as an FBX with these settings:
Make sure 'Selected Objects' is disabled, and use FBX Units Scale as 'Scaling'.
Then, just import the just exported 'MyNewRace.fbx' and its textures in the RCK.
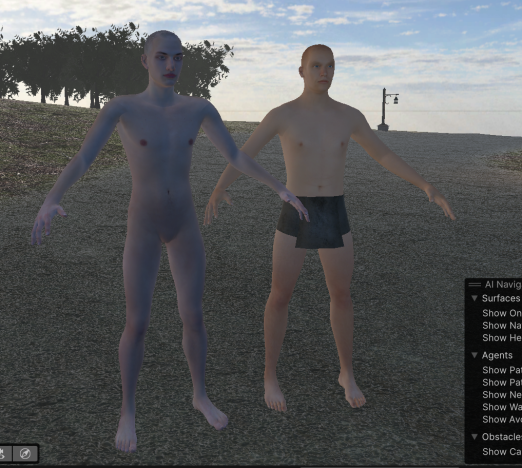
If you did everything correctly the model will be of the right size, which should be very close to the RCK's default characters in my case:
Also make sure to set the "Animation Type" as 'Humanoid' in the Rig tab of the 3d model imported in Unity.
We did the hard part! Let's move on.
Step 4: Setting up the Character in Unity
The next step is to setup the 3D Model to have all the components and sub-objects needed in order to work properly in the RPG Creation Kit. We'll create a prefab that represents the base for all the characters that will use this race.
Search for "CHARACTER_BaseHumanMale" in your Unity Project. Essentially, we'll just mirror the "CHARACTER_BaseHumanMale" components onto our new character.
First of all, I will rename my new 3D Model, now in the scene, "CHARACTER_BaseNewRaceMale".
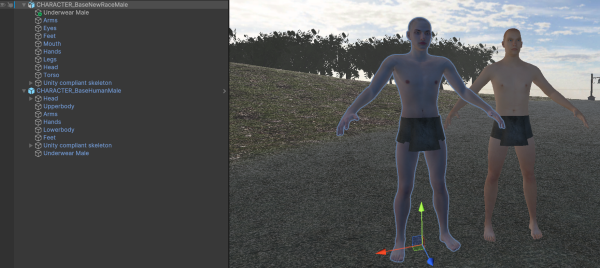
Secondly, I don't want him to be naked by default, but have an underwear. So what I will do is to duplicate the underwear of the default Human, and parent it to the CHARACTER_BaseNewRaceMale.
You'll notice that the duplicated underwear model doesn't really move, not even if you try to drag it around, that's because it's attached to the other mesh.
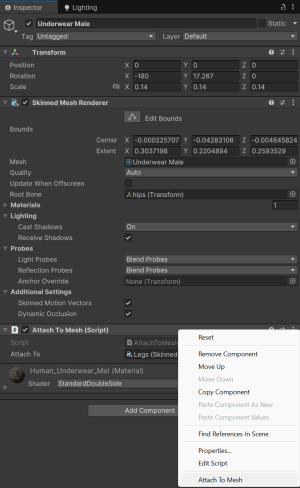
Add a 'AttachToMesh' component to the underwear object we've just duplicated, and set the "Attach To" field to the Legs of the CHARACTER_BaseNewRaceMale object. Finally, right click on the "Attach To Mesh (Script)" component and select "Attach to mesh":
If you did Step 1,2,3 correctly, the underwear mesh will correctly attach to the new character:
Awesome! This means every other piece of equipment will correctly attach to the new character, because we've exported and rigged him correctly.
Important note: for the majority of equipment pieces you should not have clipping (equipment clipping through the character's body), because the way the RCK works is that it will hide the body when it's completely covered by the equipment piece.
So if we're wearing a cuirass that covers the whole upper body, there's no point in rendering the upperbody underneath it.
However, for some items like the underwear itself, and maybe helmets as well, you don't want to disable the mesh that it is only partially covered by the piece of the equipment item. So the item may clip through the new character body. The reason is simple, the items were originally made for the default character model and no matter how similar your new race model looks, it will be different in some ways. There are many ways to fix this, here are two I'd consider:
- Add blendshapes to the equipment piece itself (recommended): you can make blendshapes on item, in this case the underwear itself to make it shrink/expand, and move in all directions. In this way, when you attach it to your new character (and any new characters you will create) you'll always be able to modify it and correctly adapt it to the new body. And it will work for how many races you will ever want to add.
- Add blendshapes to the body parts themselves: you could make blendshapes, for example, on the waist, legs, lower legs, arms, etc, that will shrink the mesh in order for the item mesh to cover the body part appropriately. This probably works as well, but if the race models are different enough it may not work correctly and you'll wish you could move the mesh itself.
It's time to add the components/objects needed for the RPG Creation Kit to correctly recognize the Race. We'll focus on the CHARACTER_BaseNewRaceMale object we have in the scene.
First of all, you need an Animator with the Avatar set as your character's new avatar, which is created when you set the 3D Model Rig as Humanoid, in the .fbx import tab. It should have been added by default by Unity, but if it's not, add it manually.
Next, we'll need some other things:
BodyData
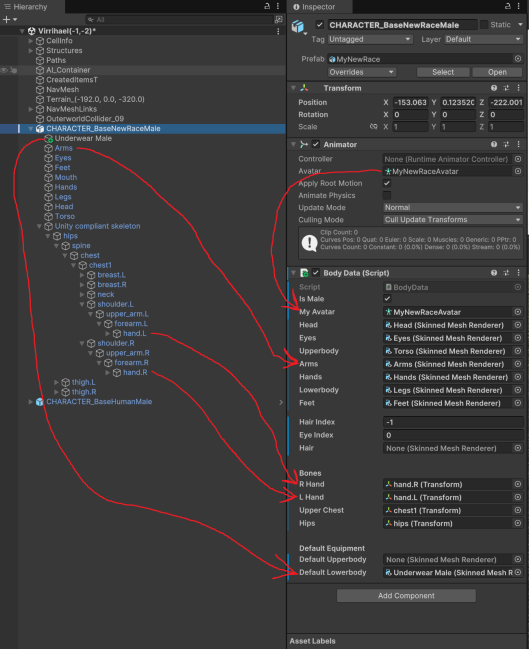
Click on your CHARACTER_BaseNewRaceMale object, at this point you should just have as components the "Animator" with the character's Avatar. Let's add a BodyData component and set it up, the properties are pretty self-explanatory, I've added few arrows just to be extra clear:
You can keep the Hair Index, Eye Index and Hair as they are, they serve as the 'defaults' for your race. In this case we have no hair and default eye color.
If you want your base character to also have default hair, you can attach the hair mesh the same way you attached the underwear. Bear in mind that your Hair 3d model has to be rigged as well, and the process is the very same of creating any other equipment, it's just that it's hair instead of a helmet!
Once you filled everything, let's move on!
AISounds
Click on your CHARACTER_BaseNewRaceMale object, at this point you should just have as components the "Animator" and the "BodyData".
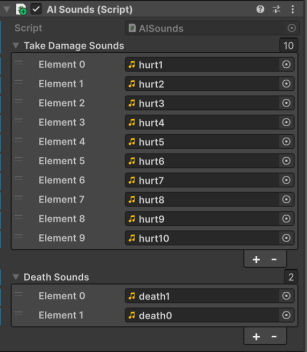
Let's add a AISounds component to it, it will allow you to define sounds that the character will emit when hit by a weapon or when he dies:
Ragdoll
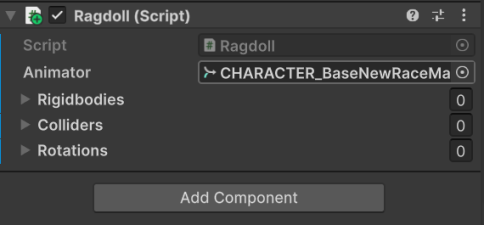
Also add a "Ragdoll (RPG Creation Kit)" component and fill its "Animator" field:
We need to define the actual ragdoll, that will allow us to not only allow the character to die via ragdoll, but to also define the hitboxes of the character itself, so that weapons can hit him. We'll do this later, for now let's keep adding the rest of the needed objects and component.
HeadPos
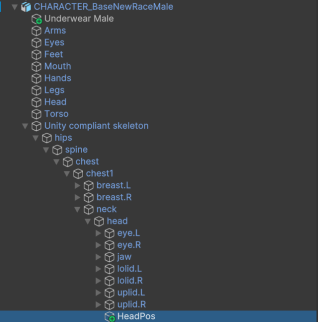
Now we need to add a new object to our character. The "HeadPos" object is just an empty object placed on the head of the character that has few components on it. It serves the purpose of keeping track of where the head of the Character is, for example, so the player camera can look at that position when he is in dialogue with him
You need to place this new object as a child of the Head bone, which is under the rig. I underline that it's not the head mesh, but the head bone.
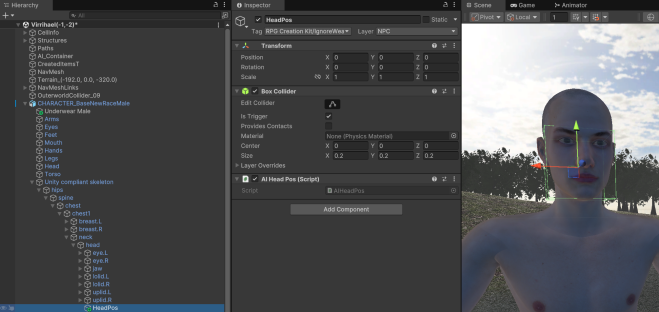
Create a new empty game object and name it exactly "HeadPos" (without quotes). Look at the image on the right.
Now, we need to add few things to this new HeadPos object:
- Set its Tag to be "RPG Creation Kit/Ignore Weapons".
- Set its Layer to be "NPC".
- Add a Box Collider component and edit it so that it fits its face.
- Add a 'AIHeadPos' component.
Overall, it should look like this:
LootingPoint
The LootingPoint objects allows the player to loot the character's body when he's dead. It's essentially an empty game object with a CapsuleCollider (defining the area the player has to look at in order to loot) and a script.
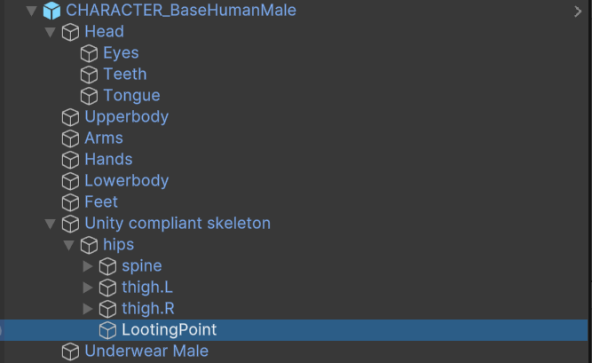
Instead of creating it from scratch, you can just duplicate the LootingPoint of the "CHARACTER_BaseHumanMale", located in the Hierarchy:
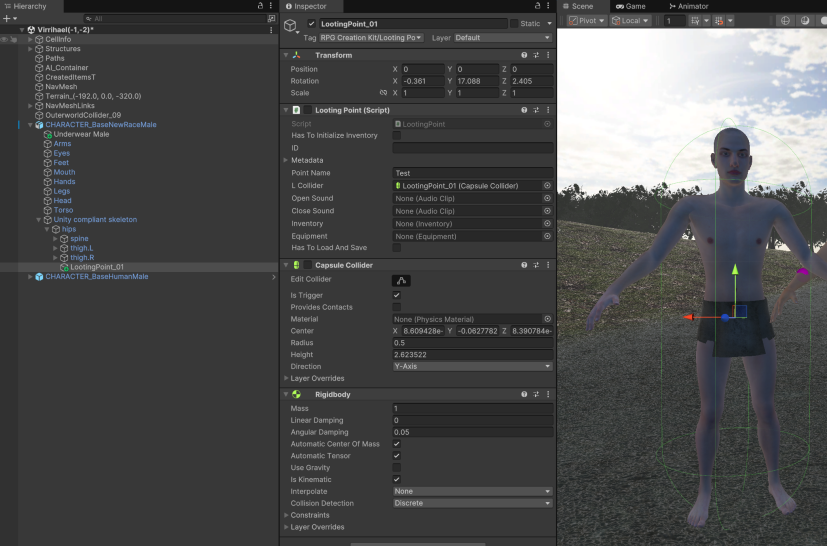
Press CTRL+D to duplicate it and move the duplicated object, "LootingPoint_01", to our new character's bone hips.
It needs to be in the Hips bone because we want the CapsuleCollider to follow the ragdoll when the character falls to the ground.
So your setup should look like this, both the "Looting Point" and "Capsule Collider" need to be disabled by default:
Don't worry about the "Test" value as the "Point Name", it will be replaced by the NPC name during runtime.
Actual Ragdoll and HitBoxes
Let's get back on adding the Ragdoll to our new character.
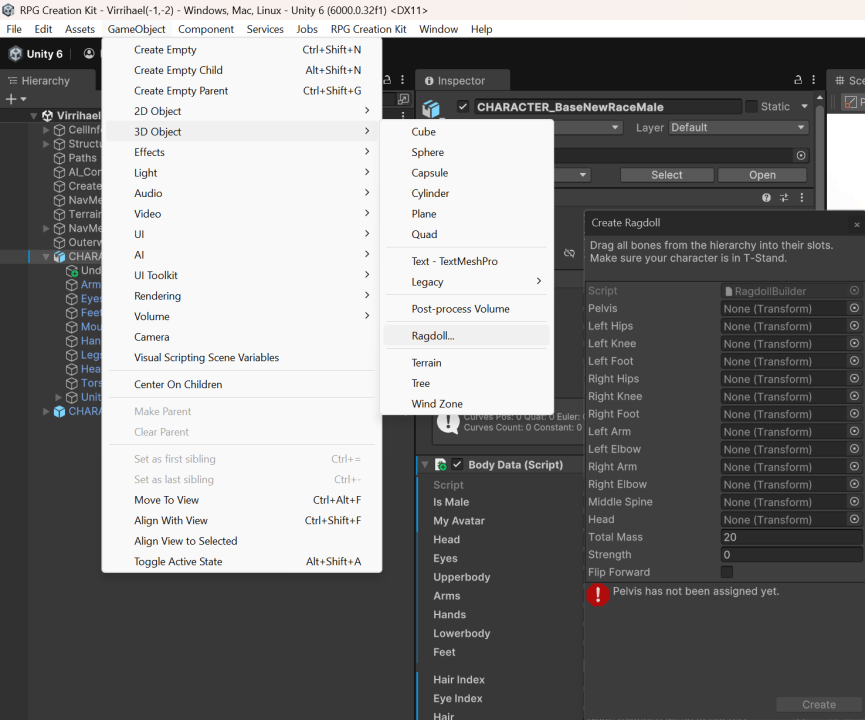
Click on CHARACTER_BaseNewRaceMale in the Hierarchy, then click on "GameObject -> 3D Object -> Ragdoll" to open the Ragdoll wizard:
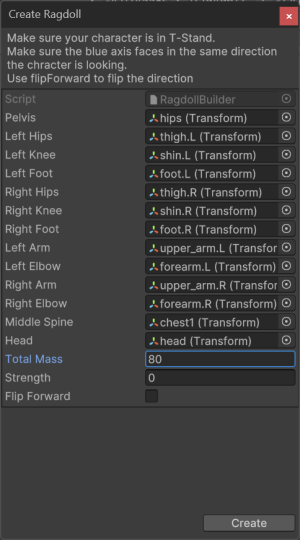
Next, you'll need to set all the bones as asked by the Create Ragdoll Wizard:
Great, now what should have happened is that Unity automatically added rigidbodies, colliders and joints to these parts. Now we have to do an important step, which is flagging these new colliders as BodyParts.
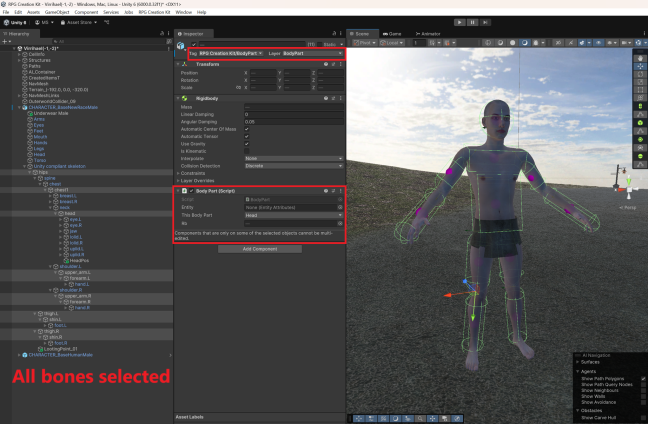
Select them all at once with CTRL+RIGHT CLICK, first of all you may need to adjust the colliders a little bit to match the 3D model.
Secondly, while all are selected you need to do these steps:
1. Change the objects 'Tag' to "RPG Creation Kit/BodyPart".
2. Change the objects 'Layer' to "BodyPart", if it asks you to change children as well, select "No, this object only".
3. Add a new "BodyPart" component on the objects.
You should have this situation now:
Great, we're almost done.
Now you need to select each bone individually and update the 'This Body Part' field in the BodyPart we've just added.
For example, on the 'Hips' you want to select "Chest" as body part, on the 'Head', select "Head", etc.
This allows the Kit to scale damage appropriately for each body parts, so you can set damage multipliers.
Last things
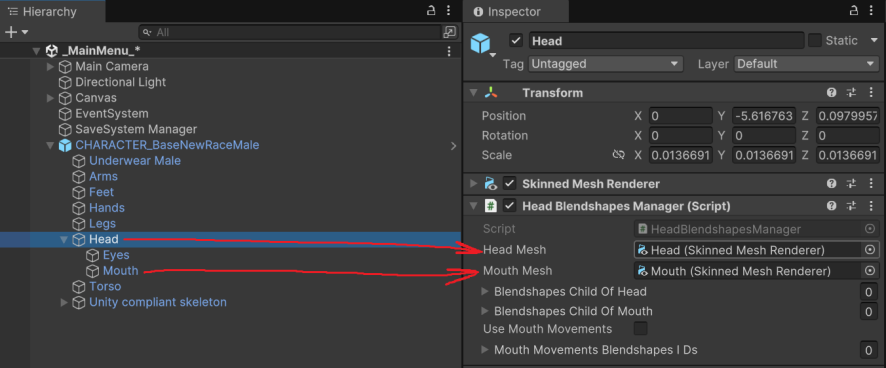
Before going on, we have to do two more things, set the Eyes and Mouth meshes of our character as child of the 'Head' mesh:
If you also have other meshes that should be in the head, like eyeleash or tongue, make sure to set them as child of Head as well.
Next, add a 'HeadBlendshapesManager' component to the Head mesh itself, and set the "Head Mesh" and "Mouth Mesh" fields appropriately:
Leave the rest of the fields empty, we'll talk about them later.
Once you've did that, we've finally finished setting up the character, and we are ready for the next step!
Step 5: Creating the Race
Now it's time to create the actual Race object.
Make a prefab of the CHARACTER_BaseNewRaceMale object we've worked on. Make sure to set the Prefab Transform Position and rotation to be (0,0,0).
Also, make a prefab of only the 'Eyes' mesh, and name it something like "MyNewRaceEyesDefault". You should create a new "Race Eyes" asset, Click on "Create->RPG Creation Kit->Character->New Eyes" and configure it such that the Mesh is the Prefab we've just created.
Next, go inside the Project Window and right click on an empty space. Click on "Create->RPG Creation Kit->Character->New Race" to create a new Race Asset. Name it the name of your race, I'll name it "MyNewRace". Go in the inspector and Update the ID to "MyNewRace", or any other ID you want to give it.
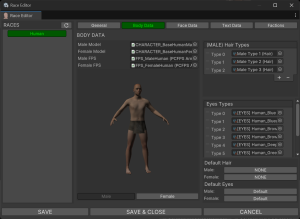
Then, click on the 'Configure Race' button, it will bring up the Race Editor.
In the General tab, you can set the default attributes for new characters that will use this race.
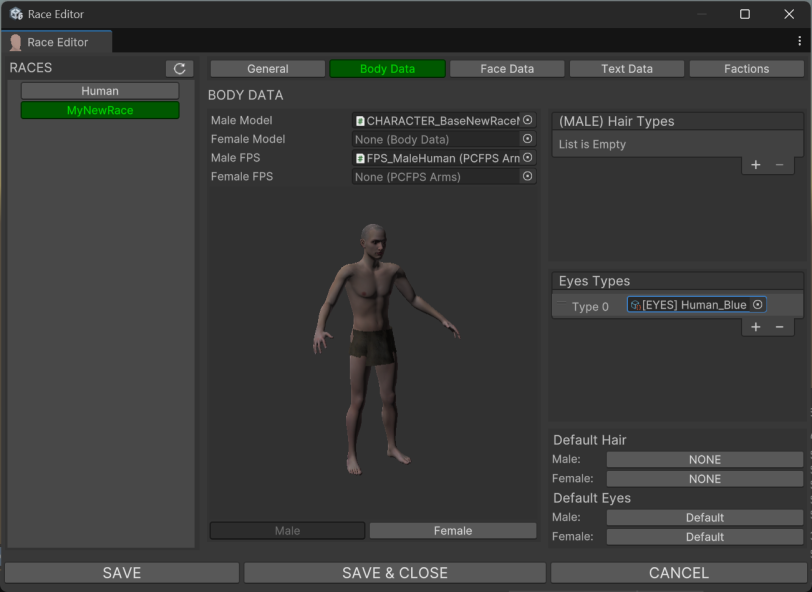
Let's go in BodyData and fill some properties. We only have the Male version of this race, so we'll only have to fill that.
As "MaleModel", set the CHARACTER_BaseNewRaceMale prefab we've just created.
As "Male FPS", set the "FPS_MaleHuman" prefab you'll find in the project window. We'll talk about the FPS Arms later.
In 'Eyes Types', add a new Entry and select the eyes you've just created. So you don't have a blank list of eyes.
So you should have this situation:
In the FaceData you'll be able to see all the Blendshapes you've created for your head mesh, I have the three I've created:
- Eyes Up/Down
- Nose Up/Down
- Lips Up/Down
Now, click on 'SAVE & CLOSE' and Update All the Databases, to do that, click on the toolbar "RPG Creation Kit -> Update all Databases".
And we're practically done! Let's test the new race now.
Testing the New Race
We'll try to create a new player character that will use this new race.
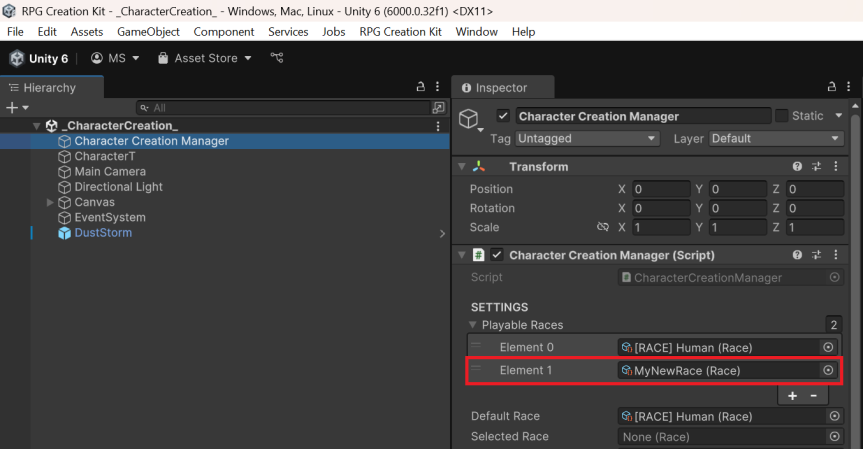
Open the _CharacterCreation_ scene and highlight the "Character Creation Manager" GameObject.
You'll notice it has a "Character Creation Manager" Component, here we need to add the new Race as a Playable Race:
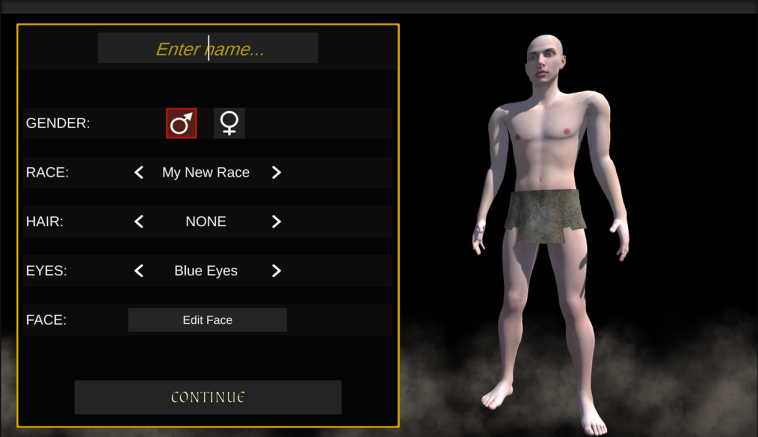
With this done, now start the game from the main menu and try to change the race, if you did everything correctly everything should work fine:
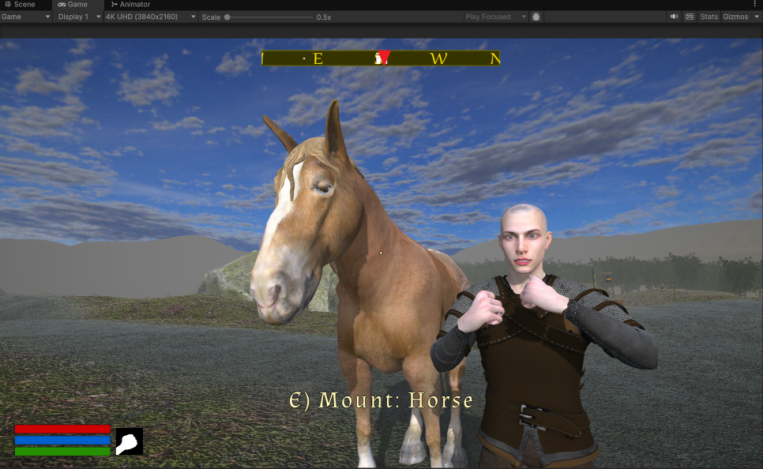
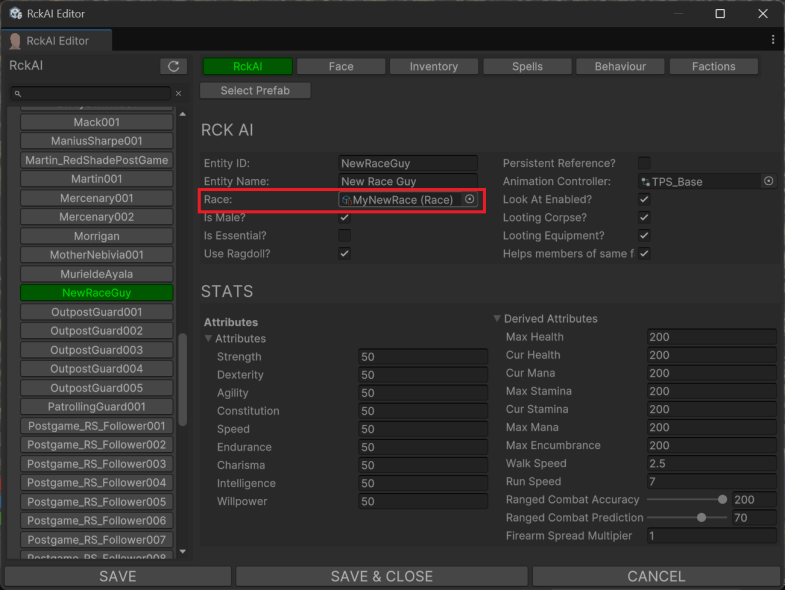
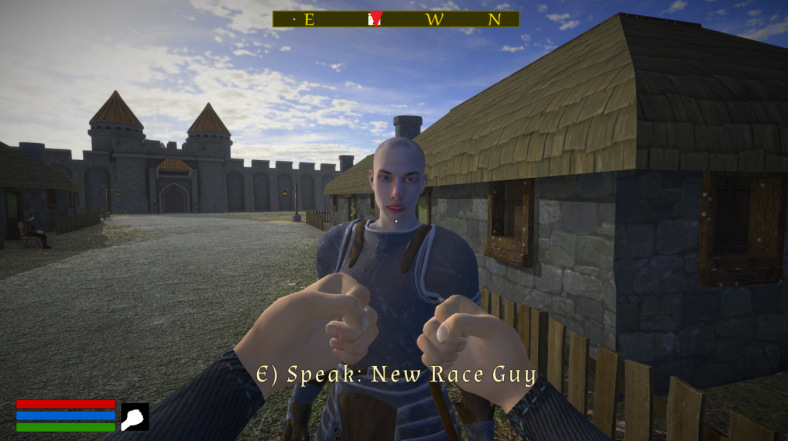
Likewise, you can now create NPCs using this new race:
Potential Issues
Here I'll list some common issues you may stumble upon:
Eyes are looking weird
Most likely you're using an Eyes asset from another race. Make sure the Eyes are the ones of your new character.
Clipping with Equipment
It's likely that when you've created the new character with the new race and went in third person, your character body clipped with the equipment.
Now, we'll discuss this properly in the next chapter "Final Considerations", but the reason why this is happening is because by default the RCK Items do not disable the body underneath it, because it's not really needed for the Demo.
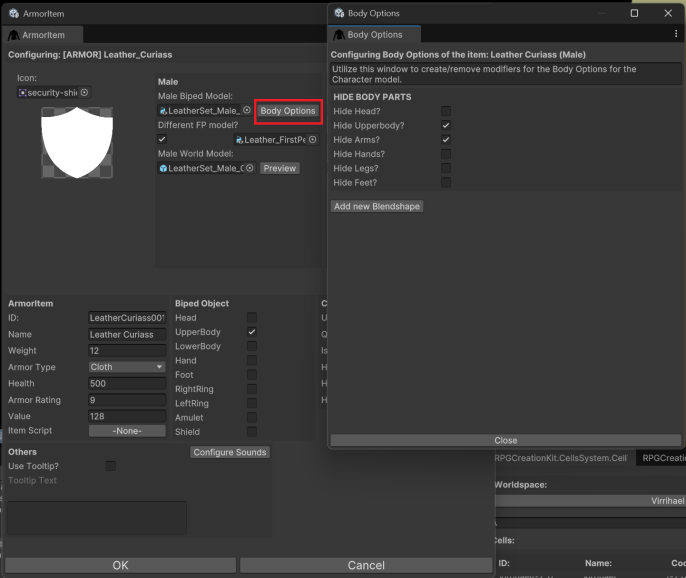
Search for "[ARMOR] Leather_Curiass", which is the default armor your character has when starting the demo. Then, click on Body Options for the Male Biped Model, here you will be able to hide body parts when this item is equipped.
You can ignore the "Add new Blendshapes" button, it will be used for a feature that will be added in a next update.
This should fix your issue, but if your character is different enough from the default character, you may still face other issues, like the equipment being a bit offset from the body. We'll explore this topic in the next chapter.
When the NPCs using the New Race die, the ragdoll is weird/bugged
This probably happens because when you made the Ragdoll and Hitboxes, you left one or more overlaps between the body parts. Make sure the colliders are on their own and they do not enter each other, otherwise when your characters go ragdoll there will be a collision to resolve that results in a buggy ragdoll death.
Final Considerations
When you're choosing your 3D models you'll want to use as races in your game, it's not a very good decision to choose models that are too different from each other. You can see this in games like Oblivion and Fallout, although the textures are different, the actual 3D models, especially for the bodies, are all very similar if not the same.
In my case, since I've used MakeHuman to make the original Race, it would have been a good choice for me too keep using that program to create new races, but for this tutorial I've preferred to start from a model that's very similar to what you'll commonly have when downloading a 3D model. We've seen when I've added the underwear mesh, I suggested to add blendshapes to the equipment itself in order to move it and scale it around the new character's body.
So my advice would be sticking with one type of body, changing textures and faces so that you won't have issues with your equipment.
Now, let's return to my character, most of the equipment items fit perfectly, but some do not. In particular, if I try to equip the "Guards" helmet, some of the head will clip out of the helmet, and I just can't hide the head underneath it because it will also hide the eyes that I want the character to be able to see.
As of the current v1.9, there's not an easy fix for this. The only thing you can really do is to adjust your character model in Blender, but this is not a final solution since that adjustment may make another helmet incompatible. That's why it's a good idea to use the very same proportions for all your races. Then, if you want some characters to be taller/smaller than others, you can always scale them afterwards, but making them all the same proportions will ensure all the equipment will be compatible.
However, since I always want to let users do as much as possible, as a next update I'll add a feature that will allow you to edit blendshapes on your equipment items and of your character bodies on a per-item-basis. That means if you have blendshapes that scale the head of your character, you'll be able to define the scale factor when an helmet, for example, is equipped (that would elegantly solve the Guard helmet problem I've explained earlier).
Or, if you have an armor that should be moved a bit forward for a specific race, you'll be able to also set that in the Body Options window (this is the same principle of moving the underwear mesh, but for every possible items that can be equipped at runtime).
Although these will ensure compatibility between different character models, still, you should follow the advice of having similar bodies. So take a good chunk of time to go through all the possible models you could use for races in your game and if you plan on using a software like Daz Genesis, MakeHuman, or any other, it's a good idea to keep using that for all your races.
